Introduction
Setup / Drivers and Software
Manual/Quick Start Guide (8.00)
The quick start instructions included with the Sony FP90 printer are easy to understand and clearly laid out. The instructions are broken up into two parts: setting up the printer and making a print. Each of these are illustrated with simple black-and-white line drawings. One nice touch is that Sony gives a brief illustrated description of the dye sublimation printing process. Most consumers are more familiar with the inkjet process, so helping them understand how dye sublimation printers work is a thoughtful addition.
Out of the box (7.00)
The Sony Picture Station DPP-FP90 comes packed with a few accessories, including a paper tray, cleaning cartridge, AC adapter and cord, and a CD-ROM with a host of software on it. The printer driver is on the CD along with Picture Motion Browser version 2.0 for Windows. Users can print straight from the box since there is a sample print pack capable of producing 10 prints (dye ribbon cartridge with 10 sheets of postcard paper).
Setup (8.50)
The PictureMate FP90 was ready to print from a memory card in just 2 minutes. All that’s involved is taking it out of the box, inserting paper into the paper cassette, and inserting the ink cartridge into the ink compartment. Then it’s just a matter of inserting a memory card in the correct slot and pressing the On button.
On our test PC, Installing software for printing from the computer took about 3.5 minutes. With restarting the computer to accept changes and finish installation, the whole software process took only 5 minutes. Total box to print time was 7 minutes.
Drivers & Administration (5.00)
Driver tools for the Sony FP90 printer are minimal, as most of the utility is found within the printer’s menu itself. The two tabs that do offer options within the Properties windows accessed from software programs are Layout and Paper/Quality. Layout simply encompasses selections for page orientation and page order and number of pages per sheet. The Paper/Quality tab lists simply Paper Source and the option to print in black and white or color. Most of these options can more easily be made from the printer itself.
The Advanced button at the bottom of each tab provides more printer-specific options, such as setting the paper size (L or P size), borderless printing, auto fine print (auto, photo, or vivid), turning the auto touch-up button off or on, and adjusting RGB and sharpness settings, from -4 to +4.
Software (6.00)
The only bundled software included on the Sony DPP-FP90’s installation CD is the Picture Media Browser 2.0.05. This browser tool helps to organize photos on your system. The first time you open the program, a dialog box asks whether you would import your media files into the browser. Selecting OK allows the program to search your hard drive and bring up any image files, which are then displayed in the Folder list on the left. Clicking on one of these folders opens it and displays the contents in the view pane on the right. This view is customizable by various criteria, including by folder name, month taken, image size, camera, or file type, to name a few. The size of the images viewed can be adjusted as can the format of the view--either thumbnails or details. This program is on par with other manufacturer’s image browsing programs, meager for the most part but with a couple of editing surprises.
Some editing functions are possible in the View/Edit option under the Manipulate toolbar. The selected image is brought up in a separate window, with various viewing tools, such as zooming, rotating, etc. The Editing tool brings up options for automatic correction, brightness, saturation, sharpness, tone curve, red-eye reduction, and trimming. Most of these tools are fairly rudimentary in their selections, but the brightness and tone curve tools offer a little more than the typical browser program. Brightness can be set for highlights, shadows, or the entire image, and contrast can be set here as well. The tone curves is very similar to Photoshop’s Curves tool, and is very useful for correcting poorly exposed images.
Photo Performance
General Performance
Warm-Up Time (7.25)
The Sony DPP-F90 was quick to warm up and be ready for printing, taking only 7 seconds to complete this process. This is faster than either of its competitors currently in our lab, the Canon CP730 (11 seconds) and the Epson PM240 (19 seconds).
Power Usage (6.54)
Our power usage tests showed that the Sony DPP-F90 did not register any power use on our wattage meter when off, but it was a whole different story when the unit was powered on running. The Sony DPP-F90 drew only 4 watts of power in ready mode, the same as its competitor, the Epson PM240, and slightly more than another close competitor the Canon CP730 (3 watts). However, when these dye subs get up and printing, they can be power hogs, consuming between 50 and 60 watts of power. This is similar to the 50 to 62 watts of power drawn by the Canon CP730, but significantly more than the Epson PM240, an inkjet compact, which drew only 12 watts of power when printing.
Photo Speed/Timing (5.87)
PrinterInfo tests photo printing speeds with two different sized color images—one 5.8 MB file and one 18 MB file—at the highest quality setting the printer can handle. The Sony PictureStation DPP-FP90 printed color 5.8MB photos at the 4x6-inch size print at 1.18 pages per minute (ppm). Larger file sizes slowed the printer down to 1.06ppm. The DPP-FP90's performance speed ranked second among its competitors recently tested--the Epson Picturemate 240, Canon Selphy CP730, and the HP A440 being the other three. Overall, the Epson printer is the fastest.
When printing directly from a memory card, the FP90 printed color photos at the 4x6-inch print size at 1.36 ppm. The Epson slowed down to 1.12 ppm when printing large files. The Epson slightly outperformed the Sony when printing small prints, but the Sony had a slight edge when printing large files from a memory card.
**Photo Color Accuracy ** (2.20)
To test the color accuracy of the Sony FP90, we printed an electronic GretagMacbeth color checker chart and used an Eye-One Pro spectrophotometer to read the chart's color density values. We then compared the printed results to the original lab values.
The Sony FP90 is one of the least accurate printers we have tested to date. The FP90 had a 9.75 mean color error and showed significant color shifting in brown, blue, green, and orange tones. The FP90’s attempt to render dark skin turned out more like midnight blue. Unfortunately, blue is probably the worst cast skin tones can take on and gives off a lifeless look that’s detrimental to even the most mundane snapshot. If color accuracy is a priority, perhaps consumers should take a look at the Epson Picturemate PM240.
Photo Color Gamut (2.99)
The chart below, created with Gamutvision, shows the color space of the printer compared to the larger fixed Adobe RGB color space. A color space represents all the possible colors a printer can produce, so the bigger the better. In the chart, the color space of the printer is represented as the solid colored shape, and is surrounded by the grid representing Adobe RGB space.

The Sony FP90 created 44.7 percent of the number of colors in Adobe RGB space. This is a solid achievement for a small printer, though obviously not as good as larger, more expensive models. It produced 3.5 percent more Adobe RGB colors than the Canon Selphy CP730, the other small dye sublimation printer we tested. But it fell short of the 48.66 percent produced by the Epson PictureMate Snap, a compact inkjet printer.
Dmax (6.84)
To determine how well printers reproduce tones, we measure a value called Dmax. Dmax is a density value corresponding to the ratio of light reflected off the paper, and represents the darkest black a printer can produce. The less light reflected, the higher the Dmax, and thus the darker the black. Because the whitest white of prints is set by the paper tone, the blackest black value is an indication of how many tones the printer can actually produce. More tones mean better gradations between contrasted tones, an effect very noticeable in human faces.
The Sony FP90 scored very well with Dmax, yielding a value of 2.30. Comparatively, another small dye sublimation printer, the Canon Selphy CP730, has a Dmax of 2.01. The Epson yielded a Dmax vlue of 2.44.This advantage in Dmax means better tonal transitions and deeper black tones, yielding better print quality overall. This Dmax value was measured on a print made with the stock color profile.
Black and White (4.00)
The FP90, despite its relatively high Dmax score, produced very unimpressive black-and-white prints. Shadows and other dark tones were indeed dark, but the overall print was flat, and many of the shadows were blocked up. Detail was held in the highlights, so both ends pf the tonal range were represented well, but the flatness and muddiness of the intervening tones left a lot to be desired. The Canon CP730 produced a lower Dmax density value, yet the black-and-white prints produced with this compact dye sublimation printer had a brighter, sharper look than the Sony print, despite some loss of detail in highlights.
Tour & Components
Front
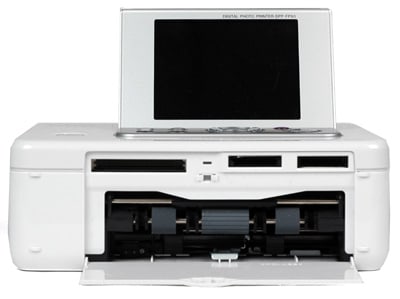
The Sony FP90 has a shiny white finish. There is a door on the front that folds down and lays flat; this is where the paper tray can be attached and prints are rolled in and out. The rollers can be seen from via the open door. Above this main paper input/output slot are three smaller slots for memory cards. These slots are exposed with no door or cover to protect them from gook, grime, and bubble gum. CompactFlash cards fit into the slot on the left, and a host of other media ranging from Memory Stick to SD and MMC fit in the slots on the right. At the top, the large display screen can be seen from the front view when it is folded upright.

Back
The most prominent feature on the back of the printer is the carrying handle which is spring-loaded to stay in place flush against the back when not in use. This prevents it from falling down and blocking the paper path slot below, where the printing paper flows out and is pulled back in to receive additional layers of ink. Above the skinny slot is a square-shaped pattern of holes that make up a vent for the motor. In the upper right corner of the back is the round port for the power cable. At the very top, the silver top edge of the display screen can be seen.

Left Side
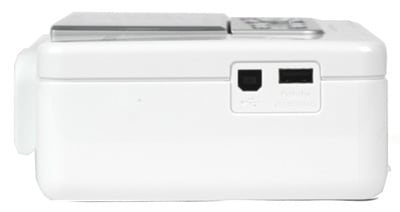
The glossy white finish on this side is interrupted by only two features that are grouped together near the front—the USB-to-computer port and the PictBridge USB port. The edge of the carrying handle can be seen at the back.
Right Side
The carrying handle can also be seen from the right side. There is a smaller door on this side that is the same design as the front paper path door. The lip near the top allows fingers to grip and pull it down. This opens to reveal the print cartridge slot, an odd-shaped hole that fits the two roller plastic cartridge. A green lock switch sits just above to lock and release the cartridge.

Top
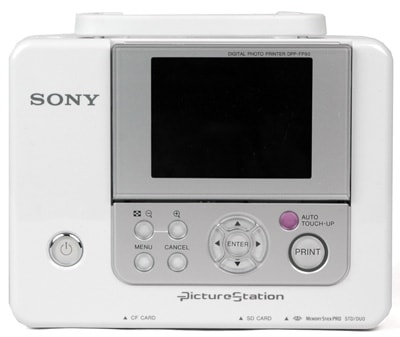
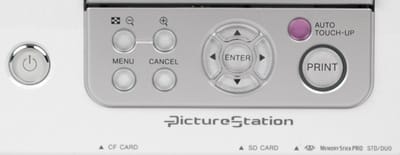
The LCD on top of the Sony Picture Station printer looks almost like a television. The large screen is positioned near the upper right corner and housed in a slim silver casing hinged at the bottom allowing it to fold upright about 85 degrees. Directly below the LCD and located on a similarly colored silver panel are the printer’s control buttons. These are all constructed of clear plastic and illuminate when in use. Nearly centered is a navigational control with four arrow buttons and an Enter button in the middle. To the right is an Auto Touch-up button and a larger Print button. To the left of the navigational control are four circular buttons stacked two atop two. On the top are zoom buttons: zoom out on the left and magnify on the right. From left to right on the bottom are Menu and Cancel buttons. Below the silver panel is a Picture Station logo along with tiny labels that apply to the memory card slots on the front of the printer. To the far left of the controls, placed on the white finish, is the power button. In the upper left corner of the top is the Sony logo.
Interior
The Sony Picture Station DPP-FP90 has only two doors that open and reveal the interior, but you can't see that much anyway. The front door shows a few printer rollers, while the door on the right side shows the deep hole for the ink cartridge. The inner workings of the printer can be seen through here, including the roller and heating element that transfers the ink from ribbon to paper.
Components
Display (8.00)
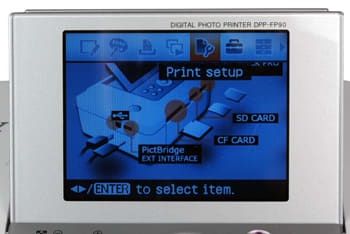
The Sony Picture Station FP90 comes with a 3.6-inch Clear Photo LCD screen that is larger than most displays on compact photo printers. It also has better resolution with 230,000 pixels. The screen tilts upward and can fold down into the printer body for better transport, too. The viewing angle of the screen is nice and wide, so users shouldn’t have to dance around to see the image. The image is bright with good contrast, so the FP90 could also double as a way to show off your snaps. The biggest difference between the FP90 and the step-down model FP70 is the LCD size, which only reaches 2.5 inches on the latter. In addition, the FP70’s screen has just half the resolution of the FP90’s, so the images won’t look nearly as smooth or rich.
Paper trays (6.00)
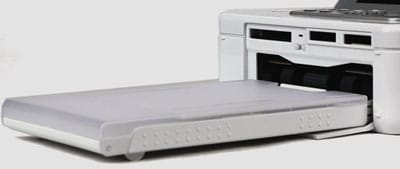
The Sony DPP-FP90 comes with a plastic, enclosed paper tray that fits into the front when the door is folded down. The paper tray holds 4 x 6-inch paper only; it cannot be adjusted to fit panorama-size or greeting card-size paper. The tray can hold up to 20 sheets at a time, which is typical of a printer this size. The tray is actually composed of three separate pieces of plastic that interlock cleverly to form a sealed compartment for storing paper when the tray is not in use. The top is hinged at one end to allow the tray to open to receive paper. A sliding door attached to the top opens when the tray is slid into the printer. The tray also serves to separate the input from the output, since prints are output atop the tray. There are no edges on the print tray to hold the prints in place, but the surface of the top is not smooth, so prints do stay in place somewhat. This paper tray is much better constructed than competing models, such as the Canon Selphy CP series printers. The Canon trays are awkward to open and load.
CD burner (0)
This tiny wonder doesn’t include a CD burner.
Battery (0)
Most printers of this size, such as the Canon Selphy and Epson PictureMate printers have an optional battery so they can print photos from anywhere even if there isn’t a power outlet around. The Sony FP90, however, will need to be tethered to the wall. It does not have an optional battery.
Power Supply
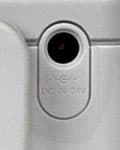
This Picture Station comes with a power cable and adapter that fit together and plug into the wall outlet. This model has no alternative power supply, such as the Canon Selphy line or the Epson PictureMate line, which can be powered with an optional battery. The power supply requires 100-240 volts of power, but there are no specs on power usage. See Power Usage in the Photo Performance section for more info.
Internal memory (0)
The Sony DPP-FP90 has Bionz image processing technology, but not much internal memory. Pictures are saved on memory cards, computers, digital cameras, and cell phones—not on the printer itself.
Hard drive (0)
No hard drive is included with this compact printer, unlike some Lexmark and HP models.
Accessories (5.00)
Sony doesn’t advertise a lot of accessories for this printer. There isn’t an option for a battery, which might disappoint some consumers who print from exotic locations. Sony does have an optional Bluetooth adapter that plugs into the side and can receive photos from enabled devices such as mobile phones, but no pricing information for this is available at the moment. The main accessory is the print packs, which Sony sells in packages of 40, 80, and 120 for $20, $30, and $35, respectively. Both the ribbon cartridges and paper are included in these packs.
Design & Interface
Controls/Buttons/Dials (7.0)
Most of the printer’s buttons are located in front of the LCD screen on a silver panel that separates them from the power button. The power button is located on the left side of the top on the glossy white finish so it is clearly distinguishable from the other controls. The most important button, the Print button, is located in the lower right corner of the silver panel. It is large and is ringed with green light when the paper tray is attached, but it is the same clear plastic as most of the other buttons. The only discolored button is the pink Auto Touch-up button above the Print button that is quite small. The navigational control moves through menus easily. There are four buttons on the left side of the silver panel that are all small with small labels. They look exactly alike, so it’s hard to tell their functions at a quick glance.
Menus (7.00)
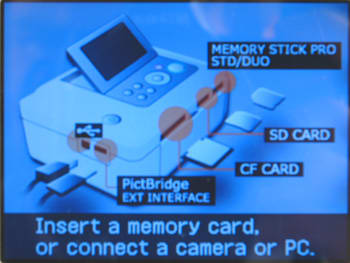
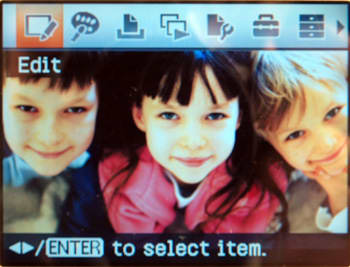
The large LCD display makes navigating the Sony FP90 printer menus a breeze. The icons and text are large and don't significantly interfere with the image view. The Menu button brings up a line of icons along the top of the display with the selected image in the background. The menu choices are Edit, Creative Print, Easy Printing, Slideshow, Print Setup, Display Printer setup, File operation, and Image Search. Selections are made by pressing the enter button in the middle of the four-way controller. At any stage in the process, directions for making selections or changes can be found along the bottom edge of the screen, usually indicating that adjustments can be made with the right and left arrows of the four-way and selections chosen with the Enter button in the center. A slider bar appears which is controlled by the right and left arrows. This responds slowly to the buttons, but it does the job. Changes can be made in several steps in either direction from center of the bar, increasing or decreasing. Exiting the menu is not intuitive, other than hitting Print or Cancel, which brings up a dialog window that asks whether the user would like to save the image.
Size / Portability (8.32)
Like other compact photo printers, these units are small, lightweight, and designed for travel. Unlike the Canon Selphy line, the Sony printers come with carrying handles. The printer measures 5 inches high, 7.1 inches wide, and 12.5 inches deep, with the LCD screen raised and the paper cartridge attached. It weighs 2 pounds 10 ounces when the paper tray isn’t attached and the ink cartridge isn’t loaded. However, these don’t add very much weight.
Inks
Configuration (8.00)
The Sony PictureStation FP90 is a dye sublimation printer so its print cartridges are ribbon cassettes that install quickly and easily into the cartridge slot on the side of the printer. These small dye sub printers employ a four-stage process, utilizing cyan, magenta, and yellow dyes with a clear overcoat layer to seal in and protect the dye layers. There are no nozzles to get clogged, as the dyes are dry and attached in a thin layer on the ribbon surface. A heating element within the printer applies selective amounts of heat to the ribbon; the more heat, the more color is applied.
Value (5.50)
Ink/paper packs come in different capacities—40, 80, and 120 sheets, sold for $19.99, $29.99, and $34.99, respectively. (See our Ink and Driver Finder.) Obviously, the larger quantity provides the best deal, and the only pack that keeps this printer competitively priced with other dye sub and inkjet compact photo printers. Prints cost 50 cents with the 40-sheet pack, 39 cents with the 80 sheet pack, and 29 cents with the 120-sheet pack. The Canon Selphy printers cost 28 cents a print for the 108-sheet pack, while the Epson PictureMate compact inkjet printers use 150-sheet ink packs that cost 25 cents per print. Inkjet prints are less predictably priced, because the amount of ink used is more dependent upon the prints made. Dye sub printers use set lengths of ribbon for each print, while inkjets apply different amounts of ink per print, so a user may get more or less prints than the manufacturer’s estimate.
Ink management tool (4.00)
Like other dye sub printers, the Sony FP90’s ink management goes only as far as the on-screen message telling the user that the ink cartridge is empty, wrong, or missing. There is no indication of how many prints are left in a print cartridge; you only find out when it runs out.
Print Settings / Options
Print Quality (3.00)
Users can't specify what print quality to use; all prints are made at a fixed resolution of 300 x 300 dpi.
Internal Editing (7.50)
The Sony Picture Station FP90 has an auto touch-up button on it that automatically corrects exposure, attempts to fix focus, and tries to eliminate red-eye. The printer’s LCD screen shows before and after images, but not next to each other. Users must scroll back and forth to see them both, making it a little more difficult to see the difference. All of the printer’s editing processes take at least a few seconds. Most of the internal editing is done through the Menu button. Pictures can be rotated, adjusted, and changed with color effects. Adjust allows the user to change settings for brightness, tint (red to green), saturation, and sharpness. There is a cross-filter highlight feature that adds fake-looking sparkle to highlights like shiny teeth and bright candles. A partial color filter casts a circular area of color in the center and reduces the rest of the image to black-and-white. Black-and-white pictures can also be printed with the monochrome option in the menu. Sepia is also available. A Paint option looks more like a sketched coloring book, and the fisheye effect adds some odd distortion. In the Creative Print portion of the menu, users can superimpose messages onto prints. There aren’t many messages; most of them are fairly typical too (eg. "Happy Birthday"). Overall, though, the Sony FP90 has a lot of editing effects even for a compact photo printer.
Dedicated B&W Settings / Effects (7.50)
Within the color effects portion of the menu, users can select the monochrome or sepia option. Users can see a preview of the black-and-white image before printing it.
Media Types (4.00)
This printer doesn’t have much variety in its compatible media. It can accept only Sony 4x6-inch photo postcard paper, which Sony sells in packs of 40, 80, and 120 sheets with ink cartridges. The paper is durable, untearable, has snap-off edges, and postcard printing on the back. This seems to be a common feature with many compact photo printers.
Connectivity
Formats / Compatibility (8.00)

This photo printer can read JPEG, TIFF, and BMP files. The FP90 is PictBridge compatible so it can accept print orders from most digital cameras.
Media Slots (7.50)
The front of the Sony DPP-FP90 has three slots for memory cards. The large slot on the left is for CompactFlash types I and II and Microdrive media. The central card slot accepts SD, SDHC and MMC media. A few cards can also fit with optional adapters: xD-Picture, miniSD, and RS-MMC. The slot on the right side accepts all forms of Memory Stick media: Duo and Pro Duo. Memory Stick micro only fits with an adapter. The slots are not protected with a cover or door.

Wireless Interface (4.00)
Unlike many other compact printers, the Sony FP90 is not capable of wireless printing via IrDA devices, but it is Bluetooth compatible, with the purchase of the optional Bluetooth adapter, the DPPA-BT1. No pricing information on this adapter was available.
Network (0)
Networking is not possible with this compact printer, much like most of its competitors.
Overall Impressions / Ease
Ease of Use (7.50)
The friendly menu design and clever editing features make the Sony PictureStation DPP-FP90 an appealing compact printer. It’s easy to install ink cartridges, load paper, and operate the control panel. Coupled with the large LCD and carrying handle, this printer is great for traveling and sharing prints with friends and family. Making prints on the go is easy, but you do have to be near a power outlet. The lack of a battery, even an optional one, imeans that this printer wouldn't be a good pick if you needed to print on the road. Even though Canon’s Selphy series printers lack the large, high-resolution LCD and carrying handle, they do have an optional battery for printing in the great outdoors. But the FP90 is easier to use than the Canon Selphy printers.****
Value (6.50)
At $199, the FP90 printer is slightly more expensive than other printers in its class. The large LCD display might explain the extra cost. The LCD, more extensive menus, and carrying handle certainly place it above many others in terms of features. However, even though most other compact photo printer manufacturers only provide a battery as an optional, separately purchased accessory, at least they do give consumers that option.
Comparisons
Although the Sony FP series have the same basic structural design as the Canon Selphy printers, the control panel, display, menu, and editing features make these Sony dye sublimation printers a much more user-friendly device. Other compact printers, like some Canon Selphy printers and the Epson PictureMate series printers, can be purchased with an optional battery for the same amount as the FP90. So the decision may come down to how important the battery is to the individual consumer.
Conclusion
The Sony FP90 is very similar in design to the Canon Selphy line of compact photo printers, but the FP90 has two advantages over the Selphy line—a much better LCD screen and a carrying handle. However, prints made with the FP90 were a bit flat and lacked the vibrancy and color range of inkjet prints. One major drawback to the FP90 is that there is no battery compartment, while most other compact photo printer manufacturers offer this as an optional accessory. If there is no need for carrying this printer to an outdoor, unpowered location, it’s a pretty good buy, but it wouldn't be our first choice.
Specs / Ratings
Specs/Ratings
{{manufacturer_specs_table}}{{raw_scores_table}}
Meet the tester

Tom Warhol
Editor
Tom Warhol is a valued contributor to the Reviewed.com family of sites.
Checking our work.
Our team is here to help you buy the best stuff and love what you own. Our writers, editors, and experts obsess over the products we cover to make sure you're confident and satisfied. Have a different opinion about something we recommend? Email us and we'll compare notes.
Shoot us an email