Here’s everything you need to know about Apple's Shortcuts for Mac
Automating tasks on your Mac is about to get a lot easier.
 Credit:
Reviewed / Jackson Rucker
Products are chosen independently by our editors. Purchases made through our links may earn us a commission.
Whatever you do on your phone, from creating to-do lists to getting directions, there's probably a way to automate it in Apple’s Shortcuts app. First released as Workflow in 2014, Apple's Shortcuts is constantly adding new features and capabilities, making it easy to turn complex tasks into clickable scripts that can speed up the daily functions you need to get your work done.
Until this year, Shortcuts was available for iOS and iPadOS only, with some capabilities transferring over to watchOS. With the upcoming release of macOS Monterey, though, you'll be able to run all your Shortcuts on your Mac, too. Here's everything you need to know.
What is a Shortcut?
A Shortcut is like a set of instructions for your phone to run on autopilot while it completes a task. Rather than having to tap and scroll your way through your apps to complete more complicated tasks like converting files and uploading them to another app, for instance, you can create a fully automated version of the whole thing that lives in Shortcuts.
The Shortcuts app serves as a sort of dashboard for automating tasks on your Apple device. It lets you pull certain actions from apps (like sending a text message or turning your Bluetooth on and off) and string them together to speed up things you frequently do on your device. A few examples include batch adding tasks to your todo list app, changing your screen’s text size, or quickly uploading the most recent photo from your camera roll to Dropbox.
Some Shortcuts exist in iOS’s Share Sheet, which makes it easy to share specific bits of information between different apps. Others can be placed on your home screen for one-click solutions to tasks like changing the colors of your smart lighting set-up in your living room at a specific time of day.
Shortcuts on your Mac
If you're not already invested in Shortcuts and automation for your mobile device, its inclusion in Monterey might not seem like an exciting bit of news. But once it finally releases later this year, all your Mac's apps are going to be a lot better at talking to each other.
You'll be able to automate file actions like pulling select files from a folder and renaming them, saving them to another drive, or adding strings of text to the beginning or end of a document. You'll also be able to batch convert files and share information between apps on your computer without having to copy and paste things back and forth.
In some cases, you might not even need to open the Shortcuts app to run a specific script. You'll be able to run Shortcuts from your Menu Bar, the Dock, or even in contextual menus when they're available. In those cases, your most frequently-used Shortcuts will always be at your fingertips.
Apple is also releasing a new Shortcuts file type, which will allow you to share and download Shortcuts files from anywhere. The company says each Shortcut file will be notarized by Apple to make sure it's safe, but like anything you download from the internet, it's important to be sure you trust the source.
Getting Started

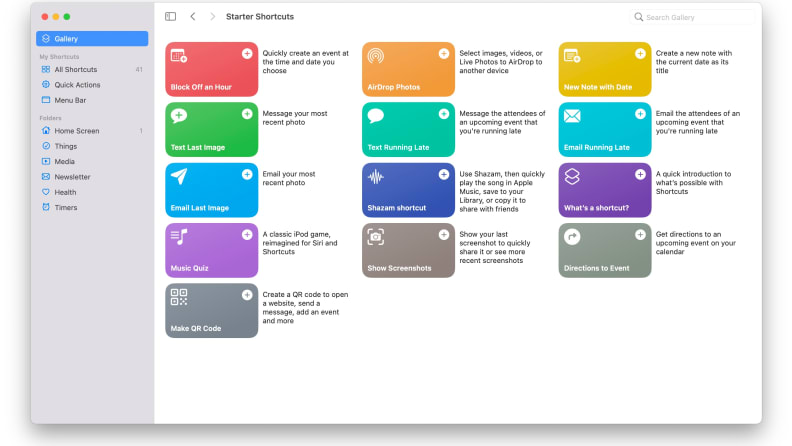
The Shortcuts Gallery contains several packs of pre-designed Shortcuts you can download and modify for your own use-cases.
While macOS Monterey isn't available publicly yet, you can download the beta and test out Shortcuts if you're feeling adventurous. To do so, you have to enroll in Apple’s Beta Software program and go through the steps to update your Mac to the Monterey beta. Once the updates have been installed, you’ll find the Shortcuts app in your Applications folder.
After you've launched the app, you'll see any of your previously built (or downloaded) Shortcuts, which you can either run or edit straight on your computer. You can also create your own Shortcuts by clicking on the plus sign in the left sidebar, just next to My Shortcuts.
Once you've given your Shortcut a name, icon, and color, you'll see the Action Library pop up on the right side of the app. From there, you can search for actions to toss into the Shortcut from any supported app. There are also categories for actions, such as Documents, Favorites, Media, and Sharing.
You'll want to be familiar with the Scripting category, which houses functions such as creating if/then statements (actions that only run when certain conditions are met) and changing your device's settings. This is where you'll find options to change variables in your Shortcuts, ask for and manage input and output, and build complex menus if you're feeling crafty.
After that, you'll have to go through a few more menus to get things finalized. Under Details you'll be able to decide upon which devices your Shortcut will be available, and how it shows up on each device—as a Quick Action on your Mac, or on your iPhone Share Sheet.
Building a Shortcut

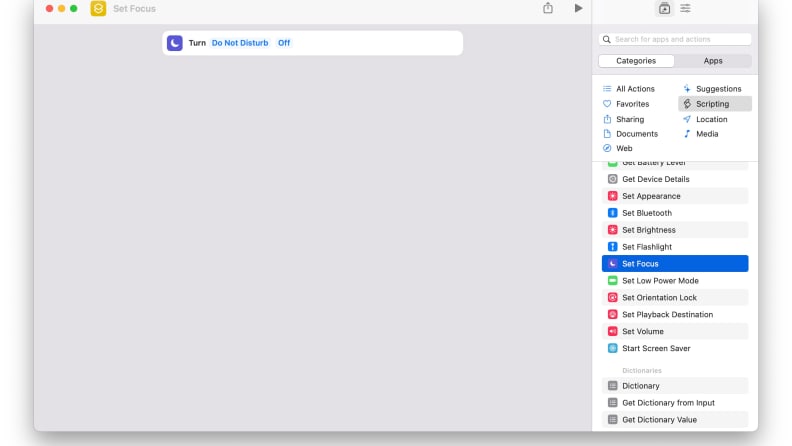
The "Set Focus" action will allow you to enable different Focus modes, such as Do Not Disturb, without having to jump into your settings.
If you're just getting started, your best bet is to take a look at some Shortcuts others have built, which you can find in the Shortcuts directory. You can study how they've been built to get a better understanding of how each action ties together, and what Scripting techniques the builder used to make it all work seamlessly.
Take special note of which actions people use to get data transferred between apps—this is usually where things can get complicated. Sometimes it'll be as simple as naming a variable and plopping that variable into a few slots, but other times it might require a few steps to translate things properly.
Once you've examined a few Shortcuts and feel like you've gotten the hang of it, you can try your hand at building one of your own. Apple has a pretty straightforward guide to building custom Shortcuts in its User Guide, which has tons of useful information. But if you want to try your hand at a quick one, making a Shortcut that will turn Do Not Disturb on and open your main works apps is an easy one.
1. Tap the plus (+) sign at the top of the Shortcuts window, which will open up a new window for you to build your Shortcut in.
2. Select Scripting from the right-hand list of Categories, and scroll down to the Set Focus action. This will be the first action your Shortcut will perform when you run it.
3. Click and drag the action into the gray area on the left, and click the Off option so it toggles to On.
4. Select how long Do Not Disturb will stay on. You can set it to stay on until you manually disable it, which is the easiest option and the one we’ll go with for now. But you can also get a little fancier with options like “Until I leave” or “Until Event ends” if you want to use this for meetings.

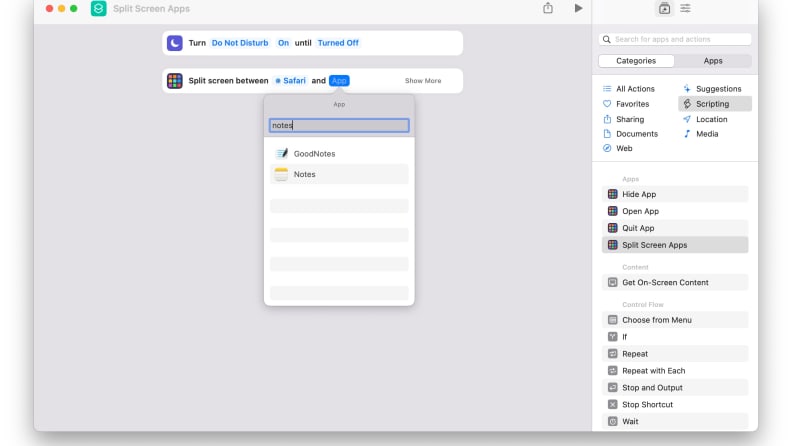
The "Split Screen" option allows you to open two apps side-by-side on either an iPad or Mac.
Next, we’ll add an action that opens two of your most-used apps in Split-Screen mode, so you can focus for a bit. You can pick any two apps you’d like, but we’ll go with Notes and Safari, in case you’re keen on taking notes as you read through your Pocket queue. (If you’d rather swap Safari for Chrome and Notes for something else, any installed app should be available as an option.)
- Under the Scripting category, select Split-Screen Apps and drag that below the previous action on the left. (Each action runs after the one above it.)
Finally, we’ll add this simple Shortcut to your Mac’s Menu Bar so you can toggle it whenever you need to knock out the distractions for a bit.
On the right sidebar, there’s an icon that looks like a bunch of settings sliders. Click on that, and make sure the Pin in Menu Bar option is checked.
Once you’ve done that, you’ll have a clickable icon that’s always in your Menu Bar, so you can easily toggle Do Not Disturb and open your necessary work apps.
After that, you’ll be able to push aside distractions at the tap of a button and save yourself a few clicks and scrolls. This is just a basic example of what Shortcuts can do. It’s capable of a lot more if you’re willing to get your hands dirty. With a bit of time and experimentation, you can automate your Mac, iPhone, or iPad to breeze through tasks that usually take up too much of your time and attention.
Additional reading
If you're all jazzed up about simplifying your workflow with a Shortcut or too, there's no shortage of places to find clever new ways to tinker with the app and all its functions.
Matthew Cassinelli's Shortcuts Gallery is a huge library of nifty Shortcuts. The folks at MacStories also have a Shortcuts Directory with lots of options to learn from and use. There's also the Shortcuts subreddit, which is fairly active, so you can always ask there if you're having trouble getting your Shortcut to work properly.
Looking at the Shortcuts app for the first time might be overwhelming, but it's easy to get the hang of, and there's no shortage of resources to help you out when you get stuck. Once you've gotten acquainted, you'll be able to automate any number of things you do throughout your day, whether to reduce a little friction between tasks, or just to find a new way to get your work done.
Now that Shortcuts is coming to macOS, you'll be able to bring that same convenience to your keyboard and mouse.
