How to upgrade your home with DIY stenciling
You don't need a total overhaul to get your bathroom gorgeous
 Credit:
Taylor Spaces
Products are chosen independently by our editors. Purchases made through our links may earn us a commission.
You crave change, but your courage is lacking. We get it. Commitment is tough.
When it comes to home décor, most improvements involve taking a plunge of some kind. Adding wallpaper, replacing tiles, buying new furniture—say hello to decision making and consequence taking.
If you’re trigger shy, there are still ways to easily change up your living space without having to make expensive and drastic decisions. A bit of know-how, a great stencil, and the right paints can have you updating (read: transforming) pretty much anything.
“Stenciling is the perfect solution to customize your home without the hassle or expense of a reno,” says Kali Lennon of Taylor Spaces in Hingham, Massachusetts. “It’s absolutely the most affordable and beautiful alternative to give a facelift to any space.”
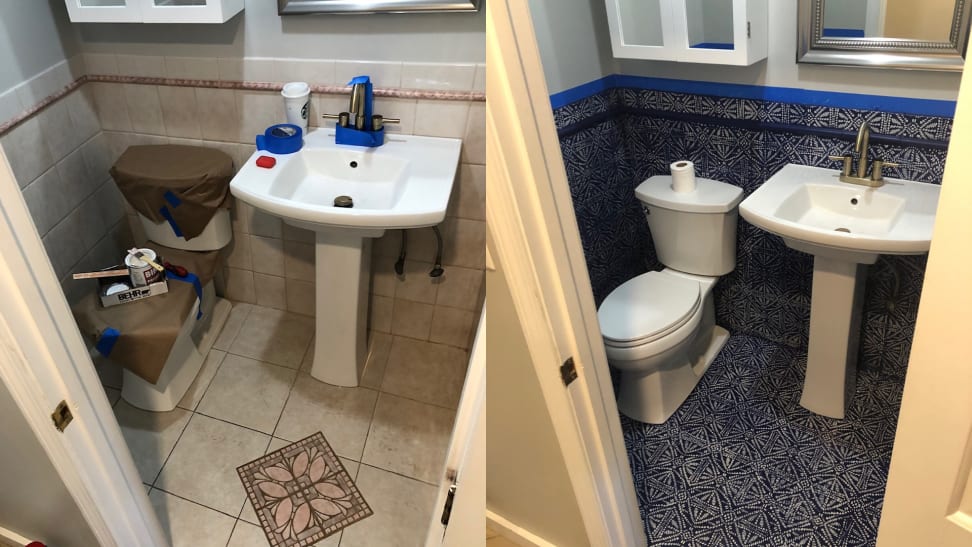
Lennon offers some tips for DIY stencil painting that allow you to turn blank surfaces into “wallpaper,” decorate boring floor tiles, and add depth to a ceiling. The only commitment you need to make is time.
What you'll need
Before ordering a ton of new materials online, try to hunt down some key materials in your home—you might have more than you think and can reduce the number of online orders you’ll have to wait on. Here are the basics you’ll need:
- High quality bonding water-based primer
- Water-based latex paint in matte finish
- Paint roller for base primer and paint, and roller covers
- Small foam roller for stenciling
- Paintbrush (preferably with synthetic bristles)
- Circular stencil brush
- Paint tray
- Painter’s tape
- Sand paper
- Putty knife or a flat surface to secure painter’s tape
- Mylar stencil
- Water-based high traffic polyurethane
How to DIY stencil paint
Step 1: Prep and paint
To Lennon, the most critical step in the layering process is advance preparation.
Start by taping around your work area. “If you’re in a bathroom, you may want to go around the toilet, base of the tub, sink, etc.,” she suggests, adding that regular painter’s tape does the trick.
“Next, be sure your surface is clean and clear of debris and sanded or lightly scuffed so that you are starting with a porous surface,” she adds. “You will want to use a high quality bonding, water-based primer.” Zinsser and Kilz are good brand options. “I would recommend at least two coats on the entire surface, and then letting this layer dry for at least 24 hours.”
Since it’s all about that base, you’ll want to layer on at least two coats of your base paint color. A water-based latex paint in a matte finish is best for stenciling. You can go high end with paint, but less expensive hardware store brands at The Home Depot and Lowe's also work well. Let this layer dry for 24 hours.
Step 2: Stencil
When it comes to choosing stencils, Lennon is a fan of ones made from mylar plastic, because they’re easy to clean and reuse. Order online from sites like Cutting Edge Stencils and Royal Design Studio Stencils. Even Etsy has options.
Once you’ve chosen a stencil pattern or design that fits well within the space, Lennon says, “be sure you have a level. Map out your pattern so you have an idea where the pattern will start and finish.”
Take your time. Depending on the base surface that’s being painted, you can reach for a small foam roller or a circular stencil brush to ensure you’re covering all of the surface variations.
“Keep in mind that painting the stencil is a slow and steady process,” she warns. In other words, slow your roll. “You will need to use less paint on the roller or brush than you think, but will need to keep layering to get full coverage.” Before moving on, align the registration marks on the stencil so you will be able to continue the pattern seamlessly.
Once you have completed stencil painting your surface, you may need to go back for touch up. “This can be time consuming, but will make your work impeccable,” explains Lennon.
Step 3: Finish with a top coat

This hallway, stenciled by Kali Lennon of Taylor Spaces, looks completely different in these before and after DIY project images.
For some surfaces like floors, or when you’re covering tiles, Lennon recommends two to three coats of water-based, high traffic polyurethane.
Make sure to allow ample dry time between coats, and always apply it with a soft brush—not a roller.
The safeguard to this plan: “If you don’t like the pattern,” says Lennon, “simply paint right over it and voila, a whole new look.”
The product experts at Reviewed have all your shopping needs covered. Follow Reviewed on Facebook, Twitter, and Instagram for the latest deals, product reviews, and more. Prices were accurate at the time this article was published but may change over time.


