 Credit:
Reviewed / Liv Birdsall
Products are chosen independently by our editors. Purchases made through our links may earn us a commission.
By mid-quarantine I was bored of being inside. As the weather warmed up I found myself wishing I had a place to sit outside in the evenings. I’m a renter in a duplex, so my outdoor space is pretty limited and I didn’t have much to work with, so I decided to try to build my own patio. Thankfully my landlord agreed to the idea and let me subtract the cost of the patio stones from my rent. (Thanks!)
The project took about 20 hours over the course of two weekends with the help of my boyfriend. I'm so glad I took it on—we’ve enjoyed the new space on cooler evenings, hosted a birthday celebration by the fire pit, and appreciated the additional space for plants. Looking back there are a few things I’d do differently, but overall the project went very well. Here's how I did it.
The prep work
Before you can get materials, you need to decide where you want the patio to be. Is the ground flat? What is the dirt like? What are the measurements? I started my project by weeding the area where I wanted to place the stones.
Then I measured the space. I recommend rounding down because the stones don’t always lay perfectly edge-to-edge. I also had to work around a concrete slab, so make sure you account for any obstacles, including buried items and the edge of your home.
I also recommend you begin to level the dirt as best you can before you purchase your stones. We did this step as we worked on each row, but it was tedious. You’ll still need to level each stone, but if you can reallocate the dirt and gravel in larger quantities while you have space, it’ll speed things up.
Supplies you'll need to build a patio

Our sketch for the original stones.
Next, I searched for the patio stones I wanted and began to sketch the patio design. My boyfriend helped me figure out how many stones we’d need and how they’d fit in the odd-shaped space. However, when we went to Lowe’s to pick them up (pro tip: bring gloves and a tape measure!) there were simple 12-inch x 12-inch patio stones on sale.
We decided to ditch our plans and opt for the squares instead. The squares made it so much easier to lay because we wouldn’t have to rotate them to fit them together, and I liked that they were larger than what we were planning to buy.
We used a shovel and trowel to move dirt, a level to check the dirt and the stones, and tape measure to make sure we weren’t slanting over the edge of the yard or too close to the house.
We used 80 patio stones in total and we were thankfully able to use the dirt we had dug up to level the stones. If you already have a flat area, I’d suggest getting a bag of soil and some sand or small gravel stones to help the stones stay in place.
How to lay the stones

We started by reallocating dirt and leveling each stone.
We just dove right in. My boyfriend and I worked on each stone together, leveling the dirt, dropping the stone, leveling the stone, stomping it into the ground, and filling in the edges with gritty dirt to keep it in place. It took us hours to do the first row because it needed to be secure and as square as possible. Once we got in the groove, each row became quicker.

As we developed a system, the rows became faster to complete.
Once you have that first row out of the way—and especially if you already leveled the dirt—you’ll get in the groove of placing, leveling, stomping, and repeat! (Yes, we actually jumped on every stone to set it in place. Unless you want a serious calf workout I recommend finding something like this dirt tamper instead.)
Once you sweep the stones off, hose the patio down to allow the dirt to set more securely and to see how well water drains.
My finished patio—and what I’d do differently

We love how the final patio turned out.
I’m so proud of how the patio turned out. Though I wish I could swap the location with my garden so the fire pit was farther from the house, I love sitting outside and enjoying the evenings.
As we built the patio, it was exciting to see it transform. At the same time, I was nervous about the stones moving over time. Thankfully they’ve stayed in place well, even after heavy rains. I think the rain and extra dirt between them have helped them secure their place even more. I still need to get a broom so I can clean off the dirt and soil more easily.

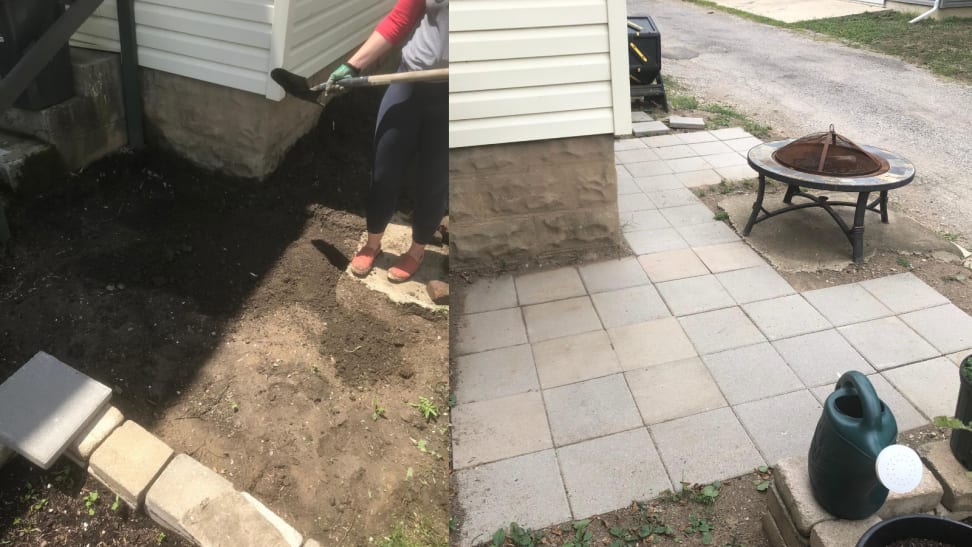
You can see how the stones set on the left and how close we came to running into the house's foundation on the right.
If I could do it all again, I'd use a dirt tamper instead of stomping on each stone ourselves and I'd change the location. I’d love to move it toward the front of the house to get more sunlight, but it gets a nice slice of the golden hour, so I’m content with all our hard work.


