Box graters make the best biscuits—here’s why
A pro pastry chef explains her tools of the trade.
 Credit:
Reviewed / Caroline Schiff / Tara Jacoby
Products are chosen independently by our editors. Purchases made through our links may earn us a commission.
Caroline Schiff is a chef, recipe developer, writer, and consultant based in Brooklyn, New York. She is currently the executive pastry chef at Gage & Tollner and the head chef of Slow Up. She has over a decade of experience in the industry from restaurants and recipes to bakeries and cafes. Her first cookbook, "The Sweet Side of Sourdough," was released Nov. 30, 2021, with Page Street Publishing.
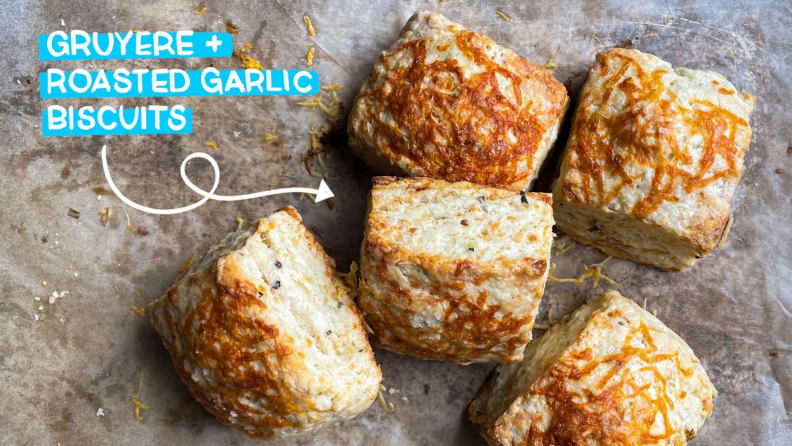
Laden with creamy bites of roasted garlic and speckled with fresh, aromatic rosemary, these biscuits are little squares of luxury, and you 100% deserve them. A box grater keeps this whole biscuiting process tight and tidy—no need to work the butter in with your hands. You’ll use two sides of the grater to achieve the best texture and distribution for both the butter and cheese throughout this rich dough.
These biscuits could become a staple on your holiday table, and they make an over-the-top breakfast sandwich with soft scrambled eggs. You can freeze them raw and bake directly from frozen when needed (like at 2 am, as you eat them warm, while staring into the abyss of your dark kitchen thinking about life).
Before you get started, pop the butter in your freezer about an hour ahead of time and make sure the gruyere is chilled as well. You can roast the garlic yourself, or as Queen Ina Garten says, store-bought is also fine.
Cooking this dish? We want to see! Tag @reviewed and @pastryschiff on Instagram so we can share your masterpiece.
What You Need

A four-sided box grater is the key to making the best biscuits.
Ingredients
For the most accurate measurements, we recommend weighing everything in grams. A good kitchen scale makes quick work out of measuring and mixing ingredients—no measuring cups or spoons required. Volume measurements are given if you don't have a scale.
- 455 grams (3 ¾ cups) all-purpose flour, plus a little more for your work surface
- 30 grams (1 tablespoon) granulated sugar
- 18 grams (4 ½ teaspoons) baking powder
- 3 grams (1 tablespoon plus 1 ½ teaspoon) fresh rosemary, finely chopped
- 15 grams (1 tablespoon) kosher salt
- 2 grams (1 teaspoon) coarsely ground black pepper
- 113 grams (1 cup) aged gruyere cheese, plus more for topping the biscuits
- 170 grams (12 tablespoons) frozen butter, in stick form
- 170 ml (¾ cup) buttermilk
- 170 ml (¾ cup) heavy cream, plus a splash for washing the biscuits
- 15 cloves roasted garlic, roughly smashed
- Flaky sea salt to garnish
Tools
- Box grater, like Reviewed’s favorite Microplane 4-Sided Box Grater
- Kitchen scale
- Baking sheet
- Parchment paper
- Set of mixing bowls
- Whisk
- Spatula
- Rolling pin
- Pastry brush
Time Needed
45 minutes
Difficulty
Medium
Yield
12 biscuits
How to Make Gruyere and Roasted Garlic Biscuits with Rosemary

These gruyere and roasted garlic biscuits are great for breakfast, lunch, or dinner.
Step 1: Prepare your baking sheet
Heat the oven to 375°F. Line a baking sheet with a piece of parchment paper and set aside.
Step 2: Combine dry ingredients
In a large mixing bowl combine the flour, sugar, baking powder, rosemary, kosher salt, and pepper. Mix with a whisk to evenly combine.
Step 3: Grate cheese
Place the box grater directly in the bowl, setting it on top of the dry ingredients. Using the side with the smaller shredding holes, grate the cheese directly into the bowl. Tap any extra cheese out of the grater and mix with a spatula to evenly combine the cheese into the dry ingredients.
Step 4: Grate butter
Place the grater back into the bowl and remove the butter from the freezer. Working quickly on the larger shredding holes, grate the butter directly into the bowl. If the butter starts to melt in your hands, pop it back into the freezer for a minute before continuing. Tap any butter off the grater and into the bowl, mixing with a spatula to evenly combine.
Step 5: Combine wet and dry ingredients
In a small mixing bowl, combine the buttermilk, heavy cream, and smashed garlic, mixing gently before adding all at once to the dry ingredients. Fold the mixture together using a spatula or your hands until a sticky, shaggy dough forms.

If you're not ready to bake the biscuits immediately, you can freeze them and bake later.
Step 6: Shape dough
Turn the dough out onto a lightly floured surface and with a rolling pin, roll it out into a 10-by-10-inch square. Fold the dough in half like a book and rotate it 90 degrees. Do this fold-and-rotate motion four times total, adding flour as needed. You can use a bench scraper as needed.
After the last fold, roll the dough out into a rectangle, approximately 7-by-10-inches in size and about 1-inch thick. Using a dough cutter or large knife, cut the rectangle into 12 biscuits, slicing three by four.
Pro tip: If you’re not ready to bake immediately, you can transfer the raw biscuits to a container in a single layer and freeze for up to one month. When you’re ready to bake, no need to defrost—pop them directly in the oven and add five minutes to the overall baking time (listed below).
Step 7: Bake
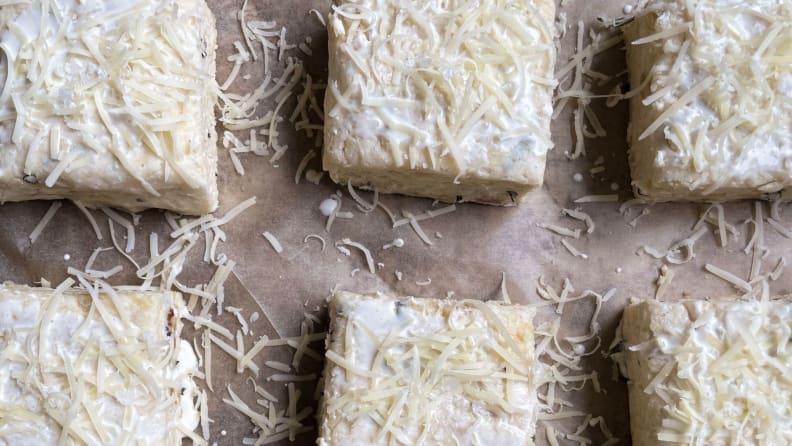
Transfer the biscuits to your baking sheet and space them out evenly. Using a pastry brush, coat the top of each biscuit with a little cream. Use the smallest shredding holes on the box frater to top each biscuit with a little extra cheese, then finish each with a small pinch of flaky sea salt and transfer to the oven. Bake until puffy and golden brown, 25 to 30 minutes. Allow them to cool for 15 minutes before enjoying.


