Physical Tour
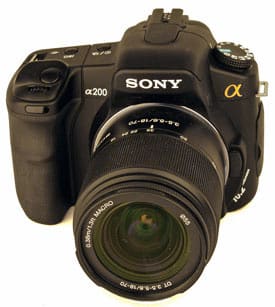
Front(6.25)
From the front, the A200 looks nearly identical to its precessor, the A100, which is fine. A substantial rubberized hand grip protrudes forward on the left. There's a deeply molded dip in the grip for the middle finger to rest in, leaving the index finger perfectly poised over the black, round shutter button. The self-timer lamp is located on the front of the grip.
Directly in front of the shutter button, on the top of the camera, is a grooved jog dial. To the right, the camera model name is printed in white text. The lens mount is placed off center toward the right, with the Sony logo embossed in white directly above it. The flash pops up behind this logo when the flash button, found on the right side of the lens mount, is pressed.
The orange alpha symbol is found to the right of the lens, beneath the control dial. Below this, on the right side of the lens mount, is a large lens release button. At the bottom right corner of the camera’s front is white text proclaiming the camera’s 10.2-megapixel resolution.
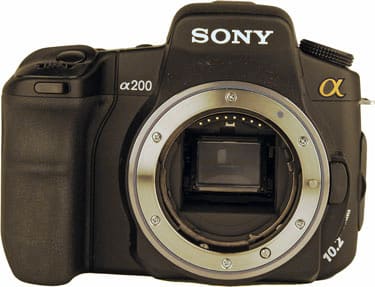
The textured, molded handgrip is a pleasure to hold.
Back (6.50)
The most prominent feature of the camera back is the 2.7-inch LCD off-center toward the left side. This represents a modest step up from the 2.5-inch LCD on the A100, though the screen resolution stays the same at 230,000 pixels. The viewfinder is directly above the LCD, framed by a soft, cushy eyecup. A sensor below the viewfinder detects when the user’s eye approaches the viewfinder, dimming the LCD and starting the auto focus system in anticipation of shooting.
The diopter control sits in a divot on the left side of the viewfinder eyecup, ready to assist eyeglass wearers in achieving a workable focus. To the left of the viewfinder is the on/off power switch, and to the right is the exposure compensation/AV button and an AEL (Auto Exposure Lock) button.
To the left of the LCD is a vertical row of buttons: Menu, Display, Delete, and Playback. To the right of the LCD is a large function button, marked "Fn." Below the function button is the four-way controller, which is the same color as the camera’s body and blends in well. The center button is marked "AF" to indicate its secondary use, as an auto focus trigger (in addition to serving as an OK button when navigating on-screen menus). The Super SteadyShot switch sits below the multi-selector, and can be moved horizontally to turn the feature on or off.
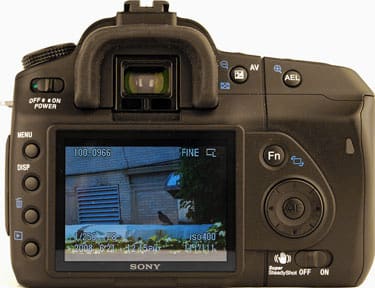
A plethora of buttons and switches await... or intimidate.
Left Side* (5.00) *The most prominent feature on the left side of the DSLR-A200 is the large mode dial, which sits on a tilted platform at the top of the camera. To its left, and barely visible, is the flash pop-up button.
The lens release button is positioned below the flash button along the left side of the camera. Below that is a small vertical switch marked 'AF MF," allowing users to switch between manual and auto focus.
A large, sturdy plastic port cover snaps open easily, protecting the remote control and DC-in jacks. Above the port cover is an eyelet for the neck strap.
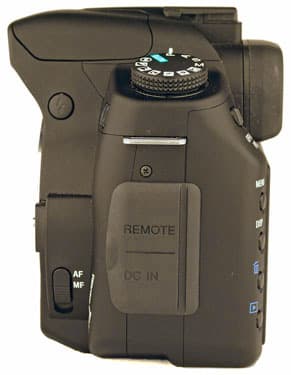
Nice port cover design, though you'll probably
never have to open it.
The right side of the camera features the prominent hand grip. Its rubberized material is different from the smoother, plastic camera body, helping to ensure a secure hold. The back portion of the hand grip is a large plastic port cover, which slides back and pops open on a sturdy spring. Inside are a slot for a CompactFlash (Type I or II) memory card, and a small port for USB and AV cables.

*A proprietary USB connector joins the
CompactFlash slot behind the black door.
*
Here’s where the A200 differs most notably from Sony’s A100. The A200 features a mode dial on the left side of the camera’s top, which was occupied by a function dial on the A100. On top of the camera is a hot shoe, made of black plastic instead of the typical chrome silver, helping it to blend into the look of the rest of the camera. To the right is the self-timer/drive mode button, and next to that is a single-purpose ISO button, which isn’t found on the A100. In front of the ISO button is the shutter button, which is black and smaller than that found on most SLRs. In front of the shutter is a grooved jog dial.
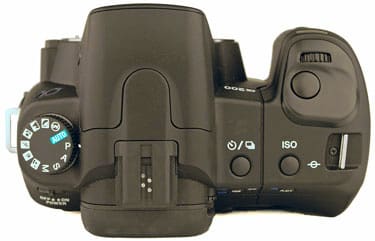
Clean, functional design is nothing to look down on.
Under the hand grip on the A200 is a port cover that shields the camera’s battery. After sliding back the secure latch with a fingernail the cover pops open to reveal the battery. The metal tripod socket is centered under the lens, toward the right side of the camera.
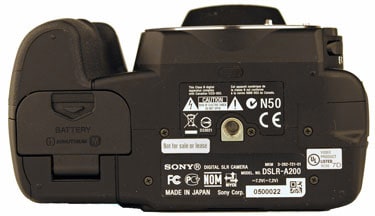
*The tripod socket is sturdy, the battery
compartment solidly latched.
*
Testing/Performance
The A200 stood up well to our extensive battery of laboratory tests. Granted, there was no performance breakthrough here that set our hearts aflutter, but more to the point for an inexpensive camera like this, we didn't find any deal-breaking flaws. We were pleased to see that even penny-pinchers can take photos with good image quality with the A200.
**Color **(8.34)
While there's a widespread fixation with how many megapixels a camera can boast, color reproduction is actually the quality in a photo that draws the most attention as people paw through your prints. To see how well an individual camera stacks up against the competition in this regard, we run lab tests shooting an industry-standard Gretag Macbeth color chart under precisely controlled lighting conditions. The resulting images are then processed using Imatest image analysis software, which can determine even the most subtle differences between the known values of the color squares on the chart, and the color information recorded by the camera.

*The ideal color in this test result represents the original color,
the outer rectangle the camera's rendition.
*
The A200 performed well when it comes to color accuracy, especially for a camera at such a low price. In the chart above, the original color from the Gregtag Macbeth chart is shown by the small rectangle at the right of each square patch. The color captured by the camera is shown by the large outer rectangle, while the captured color with luminance correction applied is shown by the inner square. As you can see, no glaring disparities appear anywhere in the color spectrum. An additional Imatest chart represents the reported color shift graphically:

*The squares indicate the original color chart,
the circles what the A200 captured.
*
In this chart, the recorded colors are shown by the circular markers, the ideal colors by the squares. We look for nice short lines connecting the two, indicating only a small color shift. And in the A200 chart, these lines are consistently short, with only a few noteworthy shifts in a few shades of blue. This performance stacks up nicely against other SLRs we've put through the same testing regimen, surpassing the Nikon D60 handily, and very nearly matching the results for the Nikon D300, a camera costing roughly four times as much with lens.
Sony A200 Color Scores

The ability to capture fine details is clearly another major factor in selecting the right camera for your needs. This is especially true with today's high-megapixel cameras, which enable you to blow up a small section of the recorded image into a large print. However, the number of megapixels doesn't necessarily correlate with useful resolution in the photos you take. To find out the true resolution performance of a camera we take it into the lab and take hundreds of test shots of a standard resolution chart, trying out the full gamut of camera settings. Then we fire up Imatest software to determine how many alternating horizontal and vertical lines the camera actually captured (measured in line widths per picture height, or lw/ph).

The industry-standard resolution chart that we use for testing
The A200 turned in decent results in this test, not quite on a par with the Nikon D60 and Canon XSi, but within shooting distance of these models. The maximum horizontal resolution measurement was 1803 lines, with slight undersharpening, with the lens set to a wide angle. Performance was reasonably consistent as we zoomed in, though it did fall off noticeably at the longer telephoto range.
Sony A200 Resolution Scores

Visual noise is kind of like the noisy static you hear when the radio's tuned between channels – random irritating speckles caused by electrical glitches. In your photos this translates into blotches in areas of flat color and bright spots in dark portions of an image. Noise is particularly prevalent in photos taken in low-light conditions, and gets progressively worse as ISO settings increase.
To test a camera's noise performance, we photograph the Gregtag Macbeth color chart at the full range of supported ISO settings, then analyze the results using Imatest software looking both for image noise at particular settings and for trends that arise as the ISO gets higher.
In our manual settings test, noise levels started out at barely over half a percent and rose at a modest rate. Interestingly, the choice to turn noise reduction on has essentially no effect at all until you hit ISOs above 800, when the imaging processing software in the camera kicks in and makes a major difference.

The A200 results for noise were roughly on par with expectations. Nikons are known for their low-noise prowess, and the Sony clearly couldn't measure up to that standard, but the Sony did outscore the Canon XSi in the manual settings test.
Sony A200 Noise
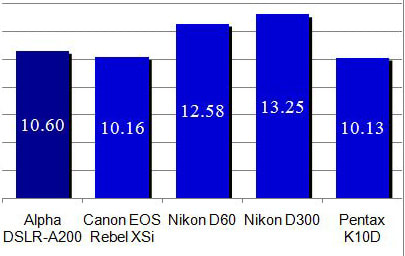
We run a separate test to gauge noise levels with the automatic ISO setting engaged. The A200 did relatively poorly here. Even under our bright studio lights, the camera chose an ISO setting of 400, where most cameras we test shoot at 200 with the same lighting. Higher ISO settings, more noise.
White Balance (7.87)
The human mind does a great job adjusting for the different colors of light in our environment, basically filtering what the eye sees so the illumination looks white except under extreme circumstances. In fact, though, the color of light from the sun is vastly different from that cast by a household lightbulb or a fluorescent tube. A digital camera has to adjust to these differences to produce photos that look the way we remember the scenes we shoot – hence, white balance controls. We test this by using a variety of illumination sources to shoot a standard color chart and using Imatest to evaluate the results. We run two separate batteries of tests for white balance, one with the camera's automatic setting, the other using each of the system's preset values under the designated light source.
In the Imatest chart below we see the same color pattern layout as the color test results above: the color the camera captured is in the outer rectangle, the color corrected for luminance is shown in the center square, and the ideal color appears in the rectangular inset to the right. Keep in mind that this chart presents exaggerated differences to make comparison easier: you wouldn't see this level of white balance shift in an actual photo you snapped.
The overall white balance performance for the A200 is a decidedly mixed bag. The automatic settings had trouble with a variety of light sources, particularly shaded daylight and fluorescent illumination. Surprisingly, it handled tungsten illumination very well, which is a stumbling point for most of the cameras we test.
*Preset (10.93)
*The preset controls, on the other hand, produced very good results across the board, with flash and fluorescent lighting two notable standouts. In fact, based on these results, we'd advise taking the time to set the white balance manually whenever you're taking flash photos.
Still Life
To provide you with a useful comparison both of a single camera across the full range of ISO settings and of different cameras shooting the same scene from review to review, we include the following still life photos in our testing regimen. To view the full-resolution original, click on an image. These are large files, though (some more than 4MB), so they may take some time to download.
**Low Light **(*8.32)
*Shooting indoors without flash has become much more practical recently, as the sensitivity of sensors in even inexpensive cameras has increased and noise reduction technologies have improved. This is still an area, though, where cameras vary pretty widely, and differences are readily apparent in the final image produced. That's why we subject our cameras to two separate tests for low light performance. The key criteria: color accuracy as light levels drop, and the increase in noise as exposure times lengthen.
The A200 performed well in low-light environments, though two peculiarities did arise. First, we found that when shooting at 1 second under low-light conditions, the metering system produced grossly inaccurate readings (off by three or four stops), which threw off our initial results. We worked around the problem by setting the values manually, and it only occurred at that particular setting (though repeatedly), which probably indicates a software inconsistency of some kind. The second oddity: turning on noise reduction had virtually no impact on measured levels of noise. This is not a critical problem, though, since overall the A200 exhibited low-light noise levels that were perfectly acceptable across the board.
For the first test we maintain a constant light sensitivity setting of 1600 ISO but vary the light level, from 60 lux (roughly what you'd find in a normal room indoors) down to 5 lux (about the light level a single candle throws off in a darkened room).
As shown above, colors didn't drift out of whack badly when shooting in low light, even down to 5 lux, and the exposures are acceptably even. The chart below indicates how noise performance varies as exposure time increases. The levels here are pretty good overall, with only modest variation from a short exposure out to 30 seconds. As for the fact that turning the noise reduction circuitry on has nearly imperceptible effects on performance, it could be worse - we've seen cameras where noise reduction produced increased noise at certain exposure settings.

When compared to other cameras we've tested, low light performance for the A200 is very competitive, with only modest differences between this camera and most of the others in the group. Again, the Canon XSi fared particularly well in our recent lab testing, and outperformed the others handily.
Sony A200 Low Light
Dynamic Range (8.27)
The dynamic range of a camera indicates how well it handles the full spectrum of lighting in a single scene, from maintaining details in the shadows to holding on to tone and not blowing out in brightly lit areas. We test by shooting a backlit chart displaying patches in progressively darker shades horizontally, from pure white to solid black. These images are taken at a variety of ISO settings, analyzed using Imatest software, and the best performance detected becomes the basis for the dynamic range score.
The A200 performed adequately in this test. It started out very well, in fact, at low ISO settings, but fell off more steeply than we'd like as ISO settings increased. Turning on the camera's noise reduction circuitry decreased dynamic range at high ISO settings. Also at the highest ISOs the resolution was automatically decreased, so for consistency's sake those results don't appear in our charts and graphs.

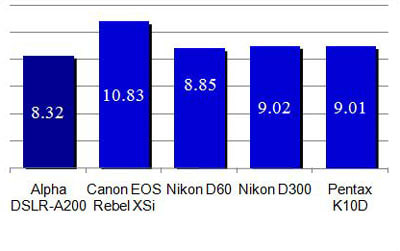
Dynamic range performance for the A200 was slightly better than the Nikon D60 or Pentax K10D. It lagged the Canon XSi by a wide margin, but the Canon proved to be an outstanding performer in this area.
Sony A200 Dynamic Range

**Speed/Timing **– Frankly, timing tests are becoming less relevant as digital camera design and engineering improve. Where once the lag between pressing the shutter and capturing an image could drive a poor action photographer mad, for example, this gap has narrowed drastically today, even with inexpensive gear. Still, we do turn up some peculiar timing results from time to time, so we continue to test several factors here. All timing tests were conducted using a 4GB high-speed CompactFlash card, so memory bandwidth limitations should not affect performance.
**Startup to First Shot **(6.60)
This is one of the areas where we do still find noteworthy differences between cameras, as some models have slow system startup routines that could cause you to miss a shot. The A200 wasn't a star performer on this test, but the average startup to first shot time of 1.14 seconds is acceptable.
**
Shot-to-Shot **(2.65)
Sony claims the A200 can shoot three frames per second (fps), though our tested results came up short of that mark at 2.65 fps (or looked at another way, a bit more than a third of a second between exposures). The Canon XSi, at 3.3 fps, was significantly faster, but the Nikon D60 was in the same ballpark at 2.75fps.
**
Shutter-Shot** (5.19)
As mentioned earlier, shutter delay is inconsequential on most SLRs today, and the A200 is no exception. While it's nearly impossible to measure this tiny interval accurately, our testing consistently came in at less than 0.2 seconds, which earns the camera our top rating in this category.
Processing (3.40)
The photo you take has to go through several steps before the camera can show you what you shot on the LCD display. This test measures the elapsed time between shutter-press and image review, and the A200 was a relative slowpoke, with an average of 2.5 seconds. This compares to 1.7 seconds for the Nikon D60, though it's only slightly slower than the 2.2-second performance of the Canon XSi.
Components
Viewfinder*(8.25)*
The viewfinder on the A200 is identical to the A100. It has 0.83x magnification and is 95 percent accurate, which is typical for digital SLR optical viewfinders. It’s above the LCD screen and is surrounded by a soft rubber eyecup.
Like its predecessor, the A200 features a small sensor under the viewfinder that detects when the user’s face is approaching the viewfinder. This automatically turns off the LCD and starts up the auto focus system in preparation for shooting. The diopter control is to the right of the viewfinder, and allows 11 steps of adjustment, from -2.5 to +1, for users who wear eyeglasses.
The viewfinder is acceptably clear, but noticeably darker than higher-priced SLRs. This is the result of using a mirrored prism design instead of glass. Mirrored prisms are less expensive, but don't pass light through as efficiently.
A small horizontal strip at the bottom of the viewfinder displays shooting information: focus, image stabilization levels, exposure compensation, shutter speed, aperture, shake warning, shots remaining, flash charge status, high speed sync, manual focus, AE lock and aspect ratio.
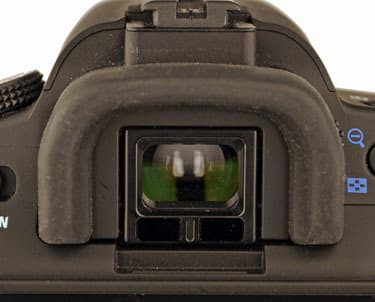
Sensors *beneath the viewfinder turn the LCD off
when you hold the camera to your eye.*
Live View
Unlike its pricier brandmates, the A200 lacks the Live View function that's gaining ground among consumer-priced SLRs (including Sony's own higher-end models). Live View allows a photographer to see the image on the rear LCD screen before hitting the shutter, the same way nearly every compact digital camera on the market works. The mechanics of an SLR are different from a compact, though, requiring a moving mirror to enable the user to see through the actual, interchangeable lens taking the picture. As a result, Live View systems for SLRs are both tricky to implement and often disappointing from a performance perspective. That said, for users moving up from a point-and-shoot, the ability to compose a photo on-screen is a powerful drawing card, and even a more sophisticated user will welcome the option to hold a camera overhead or off to the side and still see what you're shooting from time to time. If this strikes you as a killer feature, this camera isn't going to deliver – check out Sony's A300 or A350, or Canon's XSi instead.
LCD Screen(4.75)
As on other inexpensive SLRs, Sony opted not to incorporate a monochrome secondary LCD screen on top of the camera to display shooting information. Instead, the 2.7-inch, 230,000-pixel LCD does double duty, displaying shooting information when users aren’t reviewing their photos in playback mode
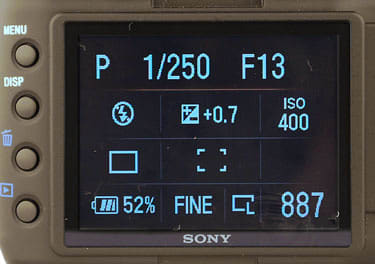
By pressing the 'DISP' button, users can toggle the shooting information screen between two views, one more detailed than the other. The more complete version includes Exposure mode, shutter speed, aperture, exposure, AE lock status, exposure compensation, ISO setting, drive mode, auto focus, metering setting, focus mode, creative mode setting, white balance, dynamic range optimization mode, battery charge remaining, image compression, image size, and number of shots remaining. Pressing the display button makes the typeface larger and removes the readouts for metering mode, aut focus mode, creative mode and flash mode.

The LCD automatically pivots the display 90 degrees so it's easy to read when holding the camera vertically. LCD brightness can be adjusted in five steps in the Setup menu.
The LCD is also used for navigating the Function, Recording, and Setup menus.
Overall it's an impressive screen, both in terms of resolution and viewing angle, with an anti-reflective coating that works well in bright light.
**
Flash (6.50)
One notable improvement over the A100 is the way the A200 flash works. The A100 had a pull-up flash, which had to be manually lifted into position, where the newer A200 has a pop-up flash. What's the difference? Not much if you're turning on the the flash manually, but with a pop-up it can also be raised automatically by the camera's programmed modes if they detect that illumination is too low to take an available-light shot.
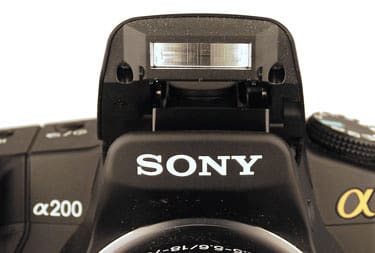
The low flash position can cause red-eye.
********The A200 offers a full set of flash modes suitable for a sophisticated shooter, including slow-sync, rear-sync and the option to control a wireless off-camera flash unit. Sony also included a handy setting on the main control dial that shoots in auto mode but keeps the flash from firing. It's a lot faster to twist the dial than bring up the menu, cursor through it and press Enter.

As to flash performance, while we'd still opt for an external unit whenever possible, the built-in did a respectable job of providing even illumination, with a good blast of power and enough breadth to light up a group of family or friends in a darkened room. The flash guide number rating is 12 meters at ISO 100. However, the flash doesn't pop up very far, increasing the likelihood of red eye when shooting in a dark room.
****On the subject of external flashes, Sony opted for a proprietary hot shoe on top of the viewfinder hump instead of going with an industry-standard connector. Doesn't mean you can't buy a flash that works, in a variety of output ratings and sizes, but it does limit your choices, and means an existing unit you already own from another camera isn't going to do you much good here.****
Lens Mount(7.00)
When Sony bought out the Konica Minolta SLR business in 2005, one of the key benefits was a well-established lens format with plenty of choices already on the market, from Konica Minolta, Sony and the usual third-party lens makers.
The basic kit lens for the A200 is a DT 18-70mm zoom (equivalent to a 27-105mm lens on a 35mm film camera), with a maximum aperture of 3.5 at the widest settting and 5.6 on the telephoto side. This zoom is more generous on the telephoto side than some other cameras in this class (the Canon XSi, for example, comes with an 18-55mm kit lens), and the glass delivered reasonable performance. The feel of the lens, though, leaves much to be desired. It feels lightweight and flimsy, the manual focus control is jittery at best, and the loud noise that's emitted when autofocus kicks in is just plain distressing.
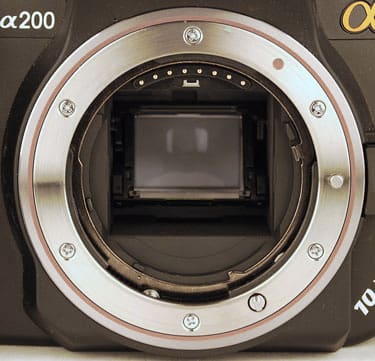
The A200 accepts Sony or older Konica Minolta lenses.
Design / Layout
Model Design / Appearance*(6.75)*
The Sony A200 looks nearly identical to its predecessor, with the exception of a few tweaks here and there. It’s on the small side for an SLR, but doesn't suffer from the too-small-to-hold-comfortably problem we encountered with the Nikon D60.
While the body is indisputably plastic, the camera has a nice heft to it and feels good and solid in your hands. The seams appear to be tightly joined, so we don't anticipate problems shooting in inclement weather. It’s entirely black, with the exception of white and blue text labeling the buttons. Even the multi-selector is midnight black. The only exception is the green around the Auto mode and the orange highlights on the lens mount and alpha symbol on the camera’s front.
The top and back of the camera is somewhat cluttered, with a wealth of separate buttons scattered around. And while the typeface used to label these buttons is easy to read, the blue ink used for labeling secondary functions is dark enough to be nearly invisible under ordinary room light.
Overall, though, the A200 looks pleasingly professional.
Size / Portability (8.00)
The Sony A200 is marketed as a portable, lightweight SLR, though it’s only slightly smaller and lighter than its predecessor. The A200 measures 5.24 x 3.74 x 2.8 inches, while its predecessor, the A100, measured 35.25 x 3.75 x 2.875 inches. The size difference isn’t very noticeable. And although Sony touts the A200 as a lighter model, it weighs the same 1 pound, 3 ounces (545 grams) that the A100 does. This is still fairly light for a digital SLR, but certainly requires the included neck strap to tote around.
The A200 features two chrome neck strap eyelets, one protruding out of the right side of the camera, and the other recessed into the left side of the camera’s top. The neck strap is a sturdy black fabric with an orange border, complementing the A200’s orange highlights.
For an SLR, the A200 is fairly portable. It has appropriate size and heft, but isn’t as bulky as more professional models..
Handling Ability(7.50)
With a rubberized grip for the right hand and a wide space on the bottom for the left, the A200 makes handling easy. The hand grip is slightly textured and molded so fingers can easily and comfortably grasp the camera.
The back of the camera has one slight contour on the right side to help support the right thumb. The weight is well balanced on both sides of the camera, with the lens on the left balancing the weight of the right hand grip.

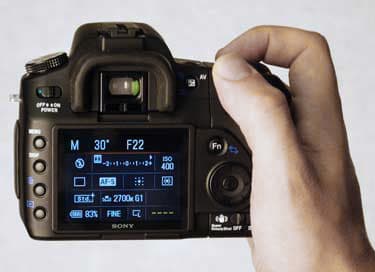
The A200 feels comfortable and well-balanced.
**Control Button / Dial Positioning / Size **(7.25)
The A200 is festooned with dials and buttons, some dedicated to a single purpose, some with different functions depending on what you're doing with the camera at the moment. Overall, there doesn't seem to be much logic involved in what went where.
Let's start with the parts that make the most sense. The control dial on the top left of the camera is a standard knurled knob which clicks into place with a satisfying snap as you turn it. Printed in white on top are the letters PASM (Program, Aperture Priority, Shutter Priority and Manual) plus seven icons for the preset shooting modes and the word 'Auto' with a green background, the near-universal color coding for 'don't worry, be happy, we'll take care of everything for you.' The four-way controller on the back is also standard fare, with one exception. In addition to serving as the OK button when working with menus, the central button in the four-way will trigger autofocus while you're shooting, without having to press the shutter halfway down. Not tremendously useful, but it might help keep heavy-fingered folks from accidentally taking pictures by mashing down on the shutter too hard when focusing. So far, so good.
On the left side of the top are two buttons. The furthest right one serves a single purpose: it brings up the on-screen ISO menu while shooting. Not sure that's a feature that most users of this consumer camera are likely to use frequently, but it's clearly labeled and certainly doesn't hurt. To the left of this button is the Drive mode button, which triggers another on-screen menu: choose between single-shot or continuous shooting, choose the self-timer or set up white balance or bracketed shooting (exposure or white balance bracketing). That's a lot of not entirely related functions, and the dual icons don't begin to hint at the variety revealed when you mash down on this button.
The buttons along the back left side of the camera are straightforward and mostly well labeled , though printing the delete and playback icons in blue makes them nearly invisible against the black camera body.
The real clunker among the controls, though, is the tiny Control dial positioned right in front of the shutter. Only a tiny bit of the circular dial peeks up above the camera body and, what's worse, the position on the top rather than up front (as seen on the Nikon D60 and Canon XSi) proves extremely uncomfortable in practice. This is especially true when attempting to use the Program shift function. You need to hold the shutter down halfway in order to take a light reading, then move the dial to adjust shutter speed and aperture while still holding the shutter down to preserve that overall exposure. But if you're using your index finger to hold the shutter, what appendage are you supposed to use to turn the dial?
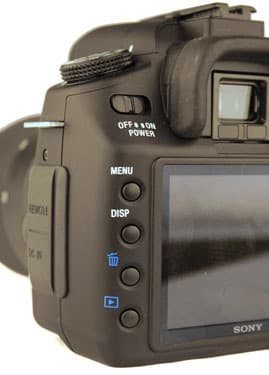
Single-purpose buttons are easy for
newbies to understand.
Menu (8.00)
The on-screen menus are bright and easy to read, with white type on a dark grey background and a festive Halloween-orange highlight bar that's impossible to miss. The typeface is clearly legible, and the icons are crisply designed and easy to understand.


Ease of Use (8.25)
The decision to break up the camera controls structure in two groups, one triggered by the Menu button on the right side of the camera, the other via the FN (function) button on the left, is a mixed blessing. Starting out, this arrangment is likely to confuse many users. There is some method to the apparent madness, though, and once you've learned your way around the camera, the split decision will actually speed up the process of inputting settings while taking pictures.
The most frequently used shooting adjustments (Flash mode, Metering mode, Autofocus Mode, Autofocus area, white balance and the setting for the D-Range Optimizer) appear on the LCD when you press FN, while setup functions you're likely to deal with before starting to shoot (image size and quality, noise reduction settings, etc.) appear after pressing Menu. The division isn't entirely consistent, though: flash exposure compensation, the red-eye reduction toggle and noise reduction settings, for example, are locked away under the Menu button, though they are settings you'd want to access on the fly while shooting.
One thing is for sure: the button on the back of the camera is a superior arrangement to the dual-dial system used on the A-100. Now the on-screen menu is right next to the control, meaning you no longer have to peek at the top of the camera for the function dial, then switch to the back of the camera to see the display.
Modes
Auto Mode(8.50)
Full Auto mode lets the camera's brain do all the work for those who simply want to point and shoot. Those with a bit more ambition can still manually set Creative Style (Standard, Vivid, etc.) the D-Range optimizer function and even the ISO – the decision not to impose the default Auto ISO setting in Auto Mode was a good one, since even beginners may grasp the picture-quality importance of this setting quickly (perhaps egged on by the dedicated ISO button practically begging for attention on top of the camera).
Movie Mode
The A200 doesn't have a Movie mode, which is hardly surprising considering what a rarity movie mode is among SLRs.
Drive / Burst Mode*(7.25)*
Your options here include single-shot advance, continuous advance, and self-timer (either 2-second or 10-second delay). Shooting continuously, Sony claims a rate of 3 frames per second, same as with the A100. There is no option to vary this rate, a feature found in some higher-end SLRs. We were pleased to see, though, that you can keep shooting JPEGs continuously until you run out of room on the memory card, the battery dies or your finger gets tired. Shooting RAW, the limit for continuous shooting is six frames and, for RAW + JPEG, three.
Exposure and white balance bracketing are also included in the Drive Mode menu.

**Playback Mode ***(7.75)*
Playback mode offers four different on-screen displays, toggled by pressing the DISP button to the left of the LCD. In addition to a clean-screen full-frame view of your photo and a view with basic image data overlaid (file name and shot number, image size and quality, shutter speed and aperture, date, time and ISO setting), there is a very nice histogram display. In addition to picture information, the histogram view shows a smaller imge of the photo flashing areas that are overexposed, and a stacked four-part histogram along the right with separate luminance graphs for the overall image and the red, green and blue channels. The fourth display is another favorite. It shows one large image at the bottom, with shooting information overlaid, along with five thumbnails along the top. This is particularly useful if you've shot a sequence of similar shots (during a sporting event, for example) and want to quickly scroll through them to find the one that captures just the right moment.

Of course, there's also a familiar full-screen index view, enabled by pressing the shared exposure compensation / index view button to the left of the viewfinder. The first press displays 9 images, the second 25, the third 4. You can cursor from one image to another using the four-way controller and press the center button for a full-screen view of your chosen photo.
When you want to see the detail in a shot you've taken, one press of the zoom button takes you to 6.1x magnification, which presents a reasonable close-up view (though why 6.1 and not an even 6 remains a mystery). Repeatedly pressing the zoom button ramps up the magnification to a maximum of 12x. One feature we particularly like here: once you've zoomed in, you can scroll through images by turning the control wheel and maintain the same magnified view from image to image. It's a real boon when you're trying to figure out which shot captured the most fine detail.
If you've chosen not to have portrait-mode images rotated automatically during playback, you can manually rotate the image by pressing the Fn button.
There's also a basic slide show mode, inconveniently located on the main menu instead of with the other playback mode controls.
Custom Image Presets*(6.00)*
Like the Nikon D60 and Canon XSi, Sony has made access to scene mode presets simple for SLR novices by putting them right on the control dial for quick and easy access.
Control Options
Manual Control Options
For an inexpensive camera presumably aimed at point-and-shoot upgraders, the A200 offers an extensive selection of manual control features. In fact, the depth and breadth of white balance control is nothing less than startling. However, there's a major user satisfaction gap between controls accessed through the well-organized on-screen menu system and those that require manipulating the control dial or manual focus ring.
Focus
Auto Focus*(6.00)*
The A200 offers three autofocus modes: single-shot (triggered when you depress the shutter half-way), continuous (maintains focus on a moving subject at all times, even if you're not depressing the shutter) and automatic (the camera selects between the two modes based on what it 'sees' in the viewfinder as long as you have the shutter button depressed).

There are nine autofocus points arranged in a three-by-three grid. Users choose between Spot focus (the middle point), Wide (the camera chooses the most prominent object in the frame as the focal point) or Local, a very strange term for what is really manual mode – you choose the focal point using the four-way controller. The problem with all of these options isn't so much their accuracy as the near impossibility of seeing the highlighted focal point indicator in the viewfinder. The center point is a perfectly visible square, but the other focus sensors are indicated by thin lines in the viewfinder. The chosen point blinks briefly when focus is achieved, and you hear a quick focus-confirming chirp sound, but figuring out which focal point is being used requires ESP. Far easier to just point the central spot focus at your intended target and hold the shutter halfway down to focus-lock it, but certainly not the quickest way to shoot.

There is no dedicated auto focus assist lamp on the A200. The flash is used instead – it emits a single bright burst when you press the shutter halfway down in a dark environment. That's all well and good when it comes to effectively illuminating distant objects you want to focus on, but it also draws a lot of attention when you're trying to capture candid shots. We'd prefer to see an auto focus assist lamp, with the flash available as an optional subsitute under difficult conditions.
Our other quibble with the auto focus performance is the unpleasant noise it makes. Particularly in continuous autofocus mode, the camera sounds like an old Chevy grinding gears.
Manual Focus (5.00)
The Auto Focus / Manual Focus switch is located on the front left side of the camera body, just below the lens. We weren't happy with the feel of manual focus. There's very little resistance as you turn the front ring on the lens, making it difficult to hit a precise spot. The problem is exacerbated by the lack of a depth-of-field preview function, so you can't really tell what's in or out of focus at a particular aperture beyond the precise focal plane.
ISO (8.50)
The ISO range runs from 100 up to 3200 in full-stop increments (100,200,400, 800, 1600, 3200), plus Auto. It would be nice to have finer controls at intermediate steps, but the fact that the range tops out at 3200 is welcome, exceeding several other cameras in this class.

White Balance (8.25)
The A200 provides a range of white balance options to please even the most anal retentive prosumer. In addition to the automatic mode you get Daylight, Shade, Cloudy, Tungsten, Fluorescent and Flash modes, each of which can be further adjusted using the four-way controller along a seven-step range from reddish to bluish. Advanced users can also directly dial in a color temperature value, or set the digital equivalent of a color-correcting filter to compensate values of green or magenta. Finally, you can take a manual white balance reading by pointing the spot metering area at a white area and pressing the shutter. You can't save multiple white balance readings to recall later, but that's about the only function that isn't included here. Is all of this overkill for the intended audience? Absolutely, but it's all tucked away in a menu the average user can ignore without feeling intimidated, so why not.

Exposure (9.00)
The basic manual exposure settings are provided: Aperture Priority, Shutter Priority and Manual. Controls are an issue, though. First, there's only a single control wheel. You can decide whether the wheel controls shutter or aperture by default during manual shooting, but either way you'll have to hold down the exposure compensation button while twirling the dial to change the second value. And, as careful readers may remember, the control dial stinks – it's tiny, ratchets around with difficulty and is poorly positioned on the top rather than the front or back of the camera..
Metering(7.50)
Three metering modes are available: Multi segment, Center weighted and Spot. Multi segment metering uses the full 40-segment honeycomb-pattern light sensor. Center weighted also reads the entire meter, but tweaks the exposure setting to favor the middle, while spot relies solely on a circular area that's clearly delineated in the viewfinder.

Shutter Speed (10.00)
Shutter speeds range from 30 seconds down to 1/4000th of a second, a generous selection. A Bulb setting, which keeps the shutter open as long as the shutter button is pressed, is also available when shooting in Manual mode. Sony offers an optional wired remote control that makes shooting on Bulb setting practical. Flash sync speed is set at 1/160 second, which is fast enough to be useful when using fill flash outdoors, or trying to capture fast-moving objects.
.
Aperture
The lack of a depth of field preview function may not disturb consumers stepping up from a point-and-shoot, who aren't used to having this capability, and Sony certainly isn't alone in scrimping on this feature. The Nikon D60 reviewed recently has the same omission,, though it's worth noting that Sony's own previous A100 model did offer depth-of-field preview. Granted, being able to see depth of field with a stopped-down lens is less imporant in digital photography than with film, since you can take test shots and check the results ad nauseum if you like, but controlling depth of field is a key to careful photography, and making it difficult is a flat-out mistake, even in an inexpensive SLR.
Image Parameters
Picture Quality / Size Options (6.90)
The A200 supports both the standard 3:2 aspect ratio and a 16:9 aspect ratio, matching the format of a high-def TV display (this is a Sony, after all, and those Bravia sets turn a tidy profit). Of course, this wide-screen format option would be more impressive if there were some way of connecting the camera directly to a high-def display – the only video output is the ever-popular yellow standard-def cable. And while some TVs are now shipping with card slots that allow you to insert an SD card directly and view your photographic achievements in all their high-def glory, the A200 uses CompactFlash, not SD cards, and we've yet to see a TV that accommodates CompactFlash.
There are four options when it comes to Image compression (quality) settings:
- RAW: The file contains precisely the unprocessed, uncompressed data captured by the image sensor, requiring computer software processing on the back end. This allows greater editing flexibility than working with a compressed JPEG image.
- RAW plus JPEG: The same image is stored as a RAW file for editing and a JPEG for immediate viewing and printing. Some cameras allow users to choose the size and compression settings for the attached JPEG, but Sony mandates a Large file with low (Fine) compression.
FINE: A gently compressed JPEG file.
STD (for Standard, not sexually transmitted disease): A more drastically compressed JPEG. You'd choose STD mode if you were trying to squeeze more images onto a memory card. Given the size and price of CompactFlash cards today, this setting is pretty pointless.
Picture Effects Mode (7.50)
Unlike Nikon, which provides a positively flamboyant array of in-camera editing tools to keep you busy on that long flight home from vacation, Sony delivers no in-camera editing features at all, assuming you'll do your cropping, lighting and color adjustment and other twiddling and tweaking on a computer (presumably a Sony VAIO). This is a problem if you're one of those consumer types who likes to use PictBridge (which the A200 does support) to print directly from your camera via a USB cable, or if you hand your memory card to the local purveyor of digital prints and ask for a snazzy 4 x 6 of each.
You do have what Sony calls Creative Style settings available while shooting, but these are permanent changes to your original photo, don't include popular in-camera options such as cropping, saving a smaller file-size copy for emailing, or turning your picture sepia. Other than the sepia thing, we like to have those options in a consumer-class camera.
Connectivity / Extras
Connectivity
Software (4.75)
The software bundled with the A200 isn’t going to make the fine folks at Adobe lose any sleep, but it’s more useful than what we usually find when we unpack a camera. Picture Motion Browser lets you sort through thumbnails, search by the date a photo was taken, and perform basic editing tasks, including cropping and adjusting brightness, color and sharpness. A second, more specialized image browser called Image Data Lightbox SR lets you open several photos and pan and scan them simultaneously for comparison purposes. Finally there’s Image Data Converter, which is used to edit RAW files. This program incorporates a wide-ranging set of RAW file adjustment options, including white balance, exposure, tone and sharpness. Picture Motion Browser is Windows-only, the other two programs come in both Mac and Windows versions.
Jacks, ports, plugs (3.25)
Without cracking the manual, you may find yourself playing hide-and-seek trying to figure out how to connect the A200 to much of anything. There's an impressive-looking flip-up plastic door over on the right side, concealing two very unfamiliar plug formats: one for a Sony remote control (not included), the other for a Sony AC Adapter (not included). So where did they stick the USB and video output ports? Next to the CompactFlash card slot, of course, and to make it even more baffling, the single port that serves for both USB and video connections requires proprietary cables (yes, those ARE included).
Direct Print Options (6.00)
The capabilities provided here are pretty bare bones. The A200 can print directly to a PictBridge-enabled printer via USB. In addition to specifying paper size and deciding whether or not to overlay the date and/or day and time on the print, your choices include bordered or borderless single-image prints, 1-, 2-, 3-, 4- or 5-up print layouts or an index print. If you prefer having your files printed professionally, you can save a DPOF order onto the memory card that specifies which images to print, and how many of each. You have no editing options with either of these printing features, though, which compares poorly to a camera like the Canon XSi, which offers trimming and red-eye correction when using PictBridge, or the Nikon D60, with its cornucopia of in-camera image editing options.
Battery (10.00)
Sony makes great batteries. They power your gear for a nice long time, last through hundreds of charging cycles, and with their InfoLITHIUM technology, you get a very accurate percentage reading of the remaining power status on the LCD screen, a big improvement over the imprecise charge-remaining icon indicators on other SLRs. The A200 is powered by an 8.4-volt NP-FM500H battery pack, rated at 750 pictures by the manufacturer. It rarely had to be charged even during our intensive testing procedures.
*Memory* (3.00)
While the manual is quick to explain that you can, in fact, use Sony's beloved Memory Stick Duo format in their camera (by purchasing an optional adapter), the good news is that the A200 relies on good old, inexpensive CompactFlash cards, in either Type I or the thicker Type II format. It will even accept an old microdrive if you have one of those in a drawer somewhere.
.
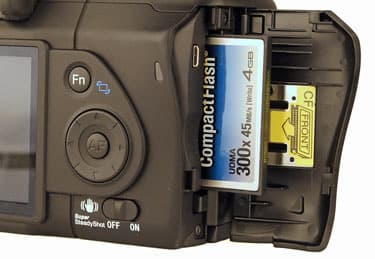
The A200 accepts CompactFlash cards.
Other features (6.25)
Dust Reduction – In addition to an antistatic coating on the low-pass filter in front of the sensor, Sony has implemented a vibration system that shakes dust away from the sensor automatically, every time the camera is powered down.
Super SteadyShot Image Stabilization –Sony, like Olympus, has opted to incorporate sensor-shift image stabilization within the camera body itself. The key advantage of this system is that every lens you lock onto the camera can take advantage of stabilization, versus either doing without or having to buy more expensive lenses with their own internal optical stabilization system, as Nikon and Canon prefer. Sony claims that the Super SteadyShot system provides up to 3.5 stops of compensation, meaning you can hand-hold a telephoto lens at a slower shutter speed or higher ISO setting without suffering visible blurring in the image. In our experience, the Sony system worked well. We even managed to squeeze off a few shots of distant sights from in a moving car… from the passenger side, it's worth noting.
Dynamic Range (D-Range) Optimizer – Like Nikon's D-Lighting system, the D-Range Optimizer function aims to tame the loss of detail in deep shadow or particularly bright areas of a photo by analyzing an image mathematically and controlling the contrast to optimize image detail. There are two settings for this process: Standard, which analyzes the entire image quickly and applies adjustments across the board, and Advanced, which breaks the image up into discrete sections and fine-tunes the contrast with more precision, but significantly more slowly. The function can also be turned off altogether. D-Range optimization is only available while shooting, though, unlike Nikon's D-Lighting system, which lets you choose between image processing while shooting, or post-processing images afterward.

Auto Focus Eye Sensor – This is certainly one of the more distinctive features of the Sony design. A small sensor located immediately below the optical viewfinder senses when you bring the camera up to your eye and begins the autofocus process, without waiting for you to press the shutter button halfway down. If nothing else, it's a great way to freak out your friends who don't know about the feature – a camera that starts whirring its focus motor at you before you even touch a control has a certain haunted-house quality.
The eye sensor can help you grab a shot more quickly, since the focusing process is often finished by the time you line your eye up to shoot. On the other hand, it's exceedingly easy to trigger that sensor accidentally, whether you're wearing the camera on a strap or just grabbing it to carry somewhere. After just a few days of shooting, we went into the custom settings menu and turned it off.
Overall Impressions
Value (8.00)
It's tough to argue with a full-featured SLR with acceptable performance that sells for $500 with an 18-70mm lens. You're getting as much resolution as any consumer needs, controls that are easy to use once you've learned them, and construction that feels solid and reliable. There's not a lot of flash to the A200 (well, there's that eye sensor thing, but we're lukewarm on that one). At the same time, if your photos don't come out well, you're not going to be able to blame the camera any more.
Comparisons
[

](https://www.reviewed.com/cameras/content/Canon-Digital-Rebel-XSi-Digital-Camera-Review-18379.htm)
**Canon XSi – **The XSi is indisputably a superior performer overall, with its outstanding color reproduction and faster continuous shutter speed. It's also indisputably more expensive at $830 with the 35-70mm kit lens, and that lens doesn't offer the wide-angle possibilities of Sony's 18-70mm. The Canon does offer Live View, allowing you to frame a photo on the LCD screen instead of peering through the optical viewfinder. However, our reviewer was less than thrilled with the performance of this Live View feature. The variety and high quality of Canon lenses are a factor in this camera's favor, though, as is the standard hot shoe for flash units versus Sony's proprietary shoe.
[

](https://www.reviewed.com/cameras/content/Nikon-D60-Digital-Camera-Review-18392.htm)
**Nikon D60– **Priced at $830 with the kit 35-70mm lens, Nikon is in for some real competition with the A200. The D60 enjoys a substantial advantage when it comes to low-light performance: if you do a lot of nighttime photography without flash, this is going to be a much better choice. A standard hot shoe for flash and the extraordinary wealth of available Nikon lenses are also worth considering. When it came to color accuracy and dynamic range, though, the Sony actually posted superior scores to the Nikon, both noteworthy victories. And the D60 uses an unimpressive three auto focus points, while the Sony offers nine.
[

](https://www.reviewed.com/cameras/content/Nikon-D300-Digital-Camera-Review-17713.htm)
Nikon D300**–**The 12.3-megapixel D300 is clearly in a different class of cameras from the others discussed here, with its $1799 price (body only) and tank-like build. What do you get for going with the Cadillac instead of the Hyundai? A much faster, more accurate autofocus system (with 51 focus points) and superior image quality across the board. It's unlikely you'll outgrow a Nikon D300. Then again, you're paying over four bucks for a gallon of gas, so you pays your money and you makes your choice.
[

](https://www.reviewed.com/cameras/content/Pentax-K10D-Digital-Camera-Review-16595.htm)
Pentax K10D**–**There are some specific points that distinguish the Pentax in this roundup, notably a weatherproof body that stands a much better chance of surviving that Everest climb than the Sony A200. It also delivers a slightly more refined autofocus system and additional control options, and matches Sony's in-camera image stabilization system. It didn't blow us away in the lab, though, and the price is nearly $1000.
**Who It’s For ***
Point-and-Shooters* – Just turn the control dial to the green AUTO setting and have fun. Our only quibbles: there is no Live View, which will turn off some veterans of point-and-shoot cameras, and if you do want to venture into more precise control of your photography, the scattered buttons and tricky manual control could be off-putting.
Budget Consumers – Step right up, we have your camera… probably. If you're the type who yearns for lots of manual control, we'd recommend looking elsewhere, even if you have to spend a few dollars more.
Gadget Freaks – You get the haunted eye sensor and that's about it for groovy gimmicks
Manual Control Freaks – It's not that manual controls aren't built into the system, or that they don't work as advertised. But accessing them with a single tiny control wheel and poorly conceived button combos is too much trouble.
Pros / Serious Hobbyists – Nothing here for this crowd. Even if you own a beloved collection of Konica Minolta lenses and want an inexpensive body to mount them on, you're better off looking at Sony's higher-end cameras.
Conclusion
**
Conclusion**

This is a basic camera that opens up the world of SLR photography to users with more enthuasiasm than cash. The A200 does have some significant limitations: manual controls are difficult to access, and its lab performance wasn't terrific. But those test results weren't terrible either – not by a long shot. The camera is responsive, feels good in your hand and lets you take very nice pictures. What's more, it comes with a lens with a wider zoom range than more expensive models, plus in-camera image stabilization that means you can benefit from anti-shake technology without investing in pricey stabilized lenses.
All things considered, we feel good about recommending the Sony A200 to the cost-conscious consumer who's ready to step up from a point-and-shoot, but isn't likely to push the boundaries of creative expression too far beyond fun family photography.
Sample Photos
**Sample Photos
Click on any of the images below to view the full-sized original image. However, please note that some of the images are extremely large (up to several megabytes) and could take a long time to download. **
**
You can browse photos taken with the A200 on the following photo hosting sites:******
[

](http://www.flickr.com/cameras/sony/dslr-a200/)[

](http://www.zooomr.com/search/photos/?q=a200)
[

](http://search.fotki.com/?q=A200)[

](http://www.smugmug.com/search/index.mg?searchWords=A200&searchType=global&x=0&y=0)****
Specs / Ratings
**Specs Table
**{{manufacturer_specs_table}}{{raw_scores_table}}
Meet the tester

Steve Morgenstern
Editor
Steve Morgenstern is a valued contributor to the Reviewed.com family of sites.
Checking our work.
Our team is here to help you buy the best stuff and love what you own. Our writers, editors, and experts obsess over the products we cover to make sure you're confident and satisfied. Have a different opinion about something we recommend? Email us and we'll compare notes.
Shoot us an email