Physical Tour
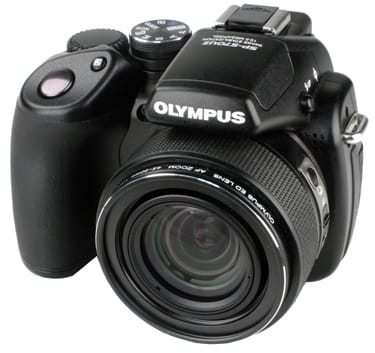
Front(8.50)
The left side of the camera offers a substantial rubberized grip, extending about an inch from the camera body and nicely sculptured to provide a solid, secure grip. The shutter is positioned on a downward-sloping segment above the grip, along with a small dedicated exposure compensation button. The self-timer lamp / auto focus assist illuminator is positioned between the grip and the camera lens. The flash housing extends nearly an inch over the lens, with the word OLYMPUS embossed in white.
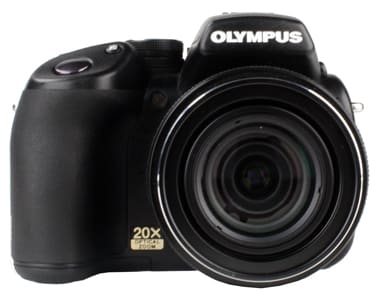
Looks like an SLR, works like a point-and-shoot,
albeit one with a powerful piece of glass up front.
Back (8.50)
The most prominent component on the back of the camera is the 2.7-inch (69mm) LCD. To the left of the screen is a vertical row of four buttons, controlling (from the top down) Playback mode / Print, Shadow Adjustment / Erase, Menu and Display/ Menu Guide. The icons for the two dual-purpose buttons are oddly placed and hard to read on the black background.
Above the screen is an electronic viewfinder, with a diopter adjustment wheel on the left side. Above the screen and to the right of the viewfinder are two additional buttons, the first of which toggles display between the viewfinder and the LCD, the second controlling Auto exposure / auto focus lock while shooting and continuous shot playback while reviewing images.
At the top of the right side is a sculptured inset panel with a patch of rubber material inset in the middle, providing a nicely designed non-slip thumb grip. Below this are four buttons laid out in a circle, which function both as a four-way controller for menu navigation and as direct access shortcuts to individual controls: from the top moving clockwise, these include a programmable Custom button, flash control, self-timer and macro. In the middle of this section is the OK/Function button. Between the screen and the macro button is the card access lamp.
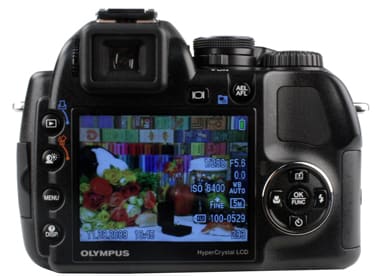
The thumb rest, with its patch of rubber in the middle,
is perfectly positioned for pointing and pivoting.
Left Side* (5.50) *There are three control buttons on the left side of the camera. At the top is the button that pop up the flash unit. The white slashed-circle mark behind this button indicates the location of the focal plane. Then, on the side of the lens barrel are the drive button, which toggles between drive modes (single-frame, sequential and bracket shooting), and the Auto Focus / Manual Focus slider switch. The lens barrel is surrounded by a textured rubber ring.
Near the back of the left side is a substantial silver loop for connecting the neck strap. Below this is a tight-fitting door protecting connectors for an optional external power supply and the supplied USB / AV cables.

The drive mode button is oddly positioned on the lens barrel.
The right side includes the other neck strap loop. Below this connector is a card cover that slides back and pops out to reveal an xD memory card slot.
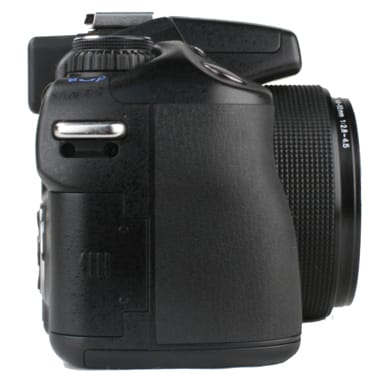
*The rubber grip extends right around the side for a nice firm hold.
*
There's a hot shoe external flash connector behind the pop-up flash. To its right is the mode dial with ten positions: Auto, Program, Aperture-Priority, Shutter-Priority, Manual, My Mode, SCN (scene mode), Guide, Movie Mode and Playback. The power switch is positioned around the mode dial, at the back.
Beside the mode dial is a control dial, used to adjust the on-screen display in playback mode, and exposure compensation settings while shooting.

*The control wheel next to the mode dial makes
settings adjustments fast and easy.*
The battery compartment cover on the left side is protected by a locking latch. It opens by pushing left, revealing spaces for four AA batteries. There's a metal tripod socket positioned in the center of the camera bottom, and at the far right side is a small speaker.
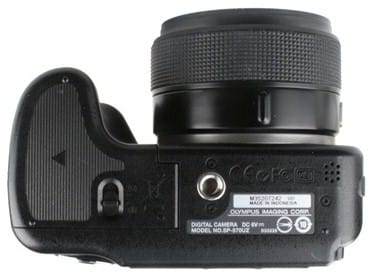
*The metal tripod socket is appropriate for a long-zoom camera
that will benefit from tripod mounting.*
Color and Resolution
Carrying a 20x zoom lens lets you grab shots you'd never capture with your run-of-the-mill 3x-zoom point-and-shoot, but will image quality problems spoil the pleasure of the hunt? To find out, we put the 570UZ through our extensive battery of lab tests, designed to smoke out imperfections in color reproduction, image noise, white balance, dynamic range and more, under a variety of lighting conditions. Bottom line? It's not the highest-performing camera we've tested, even among ultra-zooms, but nothing we found in the lab squelched our overall enthusiasm for the SP-570UZ.
**Color ***(6.38)*
When taking pictures, what you see frequently isn't what you get, especially when it comes to color reproduction. Whether caused by an intentional effort on the manufacturer's part to provide a more pleasing result, or simply the camera's innate inability to get it right, we always find noticeable differences between the reality and the reproduction. To figure out which colors are changing and by how much, we shoot an industry-standard GretagMacbeth color chart under bright, carefully controlled lighting and study the resulting images using Imatest image analysis software.
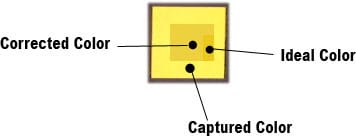
The Imatest chart shown below provides one window into the results for the Olympus SP-570UZ. The squares represent the color blocks from the GretagMacbeth chart. In each one, the outer ring shows the color captured by the camera, the inner square shows the chart color adjusted to match the luminance of the photo, and the smaller rectangle shows the uncorrected chart color.
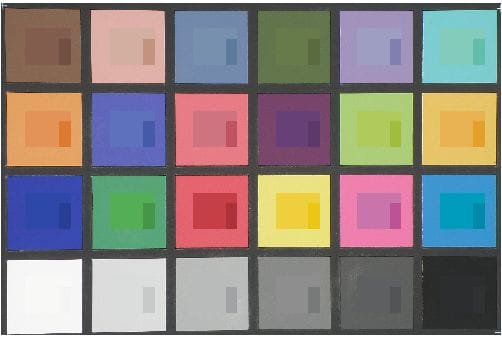
- *
Another useful Imatest color result chart reveals the degree of color shift. Here the original chart color is shown in the squares, the color as captured by the camera in the circles, and the difference between the two values shown by the length of the line that connects them.
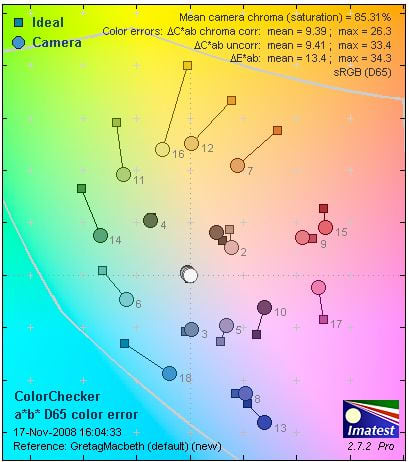
*The saturation is off for oranges and yellows, but the
basic color hues are close to the originals
*
The first result that jumps out is the 85.31% saturation in this image. The 570UZ offers two color modes, Natural and Vibrant, and we shot these tests in Natural mode. If you prefer a richer look to your photos, a switch to Vibrant will get the job done, though we're happy shooting in Natural mode and boosting saturation in image editing software if necessary. With an under-saturated image, this change can be made without harming the overall accuracy of the hues. And in this case, other than the saturation problem, the color accuracy is pretty good overall. Flesh tones are very close to the ideal, the oranges and yellows are under-saturated but not off-color, and the blues reveal only a modest color shift.
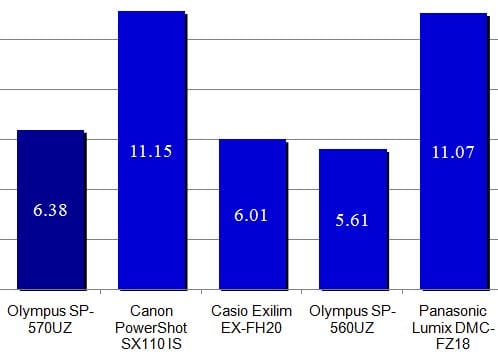
For comparison purposes, we put the 570UZ up against four other ultra-zoom models we've tested, including the earlier (and still available) Olympus 560UZ. As shown here, the Canon and Panasonic models were far more accurate than the others tested, with the 570UZ roughly equal to the other two and slightly improved from the 560UZ.
Olympus SP-570UZ Color Scores
Resolution (11.80)
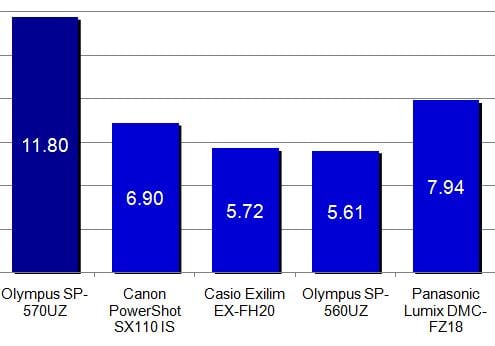
The number of megapixels in a camera's spec sheet doesn't equal the actual resolution of the final image, which relies on a combination of image sensor, optics and image processing performance. To test the bottom-line sharpness of a camera, we shoot our resolution chart under bright studio lighting, at all available full-resolution ISO settings, and use Imatest to determine how many line widths per pixel height (lw/ph) the camera is able to resolve. This reveals the point at which the cleanly drawn lines from the printed chart turn into a gray blob in the photo. For the 570UZ, the best result was achieved at a sweet spot about halfway through the lens' zoom range, with the aperture at f/4.3. As you'd expect, this high level of resolution doesn't hold up for the full range of the zoom, with much softer results at both the wide angle and telephoto extremes.
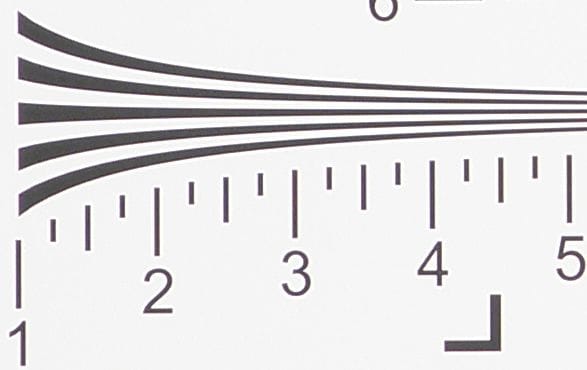
A full-size section of our resolution chart as shot by the 570UZ
The strong performance in the middle zoom range earns the 570UZ an outstanding score compared to the other tested cameras.
Resolution Scores
Dynamic Range*(5.52)*
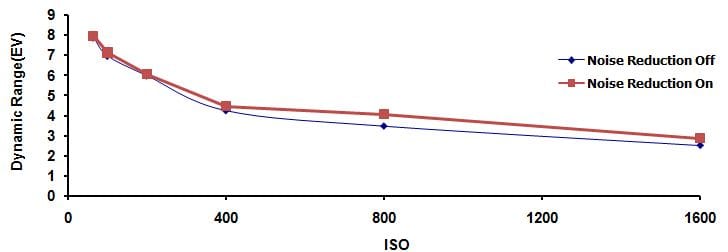
The greater a camera's dynamic range, the better it can handle wide variations in light and dark values in a photo, retaining detail in shadowed and brilliantly lit areas and not turning true whites and blacks grey. To test dynamic range, we photograph a backlit chart with swatches ranging from solid white to solid black, then analyze the resulting images using Imatest, shooting with the camera's noise reduction system both on and off when possible.
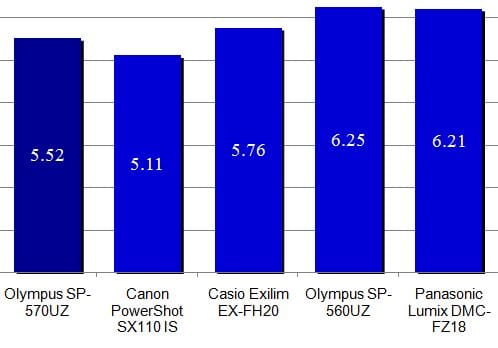
The 570UZ starts with strong dynamic range numbers which fall rapidly as the ISO increases, then flatten out after hitting ISO 400. As you can see, noise reduction had basically no effect on the result here. Clearly, for mission-critical shooting, a low ISO setting will produce far superior results, even if that means choosing a slower shutter speed and dragging out the tripod.
The 570UZ performance is about par for the course for this class of camera; the difference seen in scores here isn't very significant.
Dynamic Range Scores
White Balance*(6.04)*
When we look at a white object we're inclined to see it as white, no matter what kind of lighting it's under, because our brains automatically adjust to the different colored illumination. This task is a lot tougher for a computer's digital smarts than for our flesh-and-blood processors, and the camera's relative success in dealing with producing whiter whites under difficult conditions has a tremendous effect on the color reproduction in your final photos.
We test white balance performance in two ways. First we shoot our GretagMacbeth color chart using the camera's automatic white balance system, under a variety of light sources, and analyze the camera performance using Imatest. Then we use the camera's manual white balance presets, designed to allow the photographer to choose the type of illumination in effect rather than leaving the decision to the camera.
As is usually the case in this test, the 570UZ did quite well with some types of illumination and poorly under other light sources. White balance using flash was good, and the camera's ability to automatically cope with fluorescent light was impressive, since this is an area that often causes problems. On the other hand, results for tungsten illumination (like standard household bulbs) and in shaded daylight were quite poor. The images below are generated by Imatest to indicate the type of color shift produced under each type of illumination. Note that these differences are exaggerated substantially for illustration purposes; you wouldn't see this level of color shift in your actual photos.
-
**Preset (7.33)
*The camera's strength under fluorescent light we saw in the automatic white balance test was even more pronounced here. Olympus provides three different fluorescent presets, since fluorescent bulbs come in several different shades. We tried all three, and discovered the best-case setting produced exceptionally accurate results. Choosing the tungsten preset also produced a substantial performance boost, improving over a bad automatic result to the point where the color reproduction was quite good. Shade remained a sore spot, though. In fact, switching to the manual preset actually produced an even worse score than the automatic setting. There is no flash preset, hence the lack of a result here.
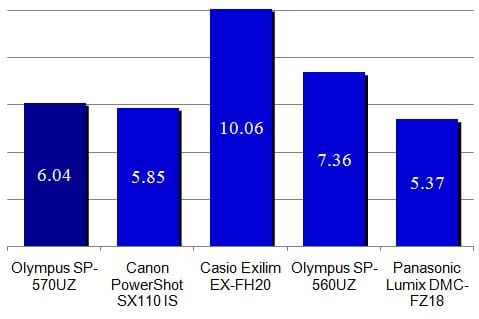
Compared to the other cameras in the ultra-zoom class, the 570UZ produced acceptable if unexciting results in our white balance testing.
White Balance Scores
Noise and Video
**Noise
**Enlarge a solid-color area of a digital photo, especially one taken at high ISO settings, and you'll see a sort of visual static, minute imperfections scattered randomly through the image. This is called image noise, and the less of it that appears in your photos, the more freedom you have to crop tightly, blow up tremendously and edit aggressively with computer software. To test for image noise under good conditions, we shoot a color chart under bright studio lighting at the full range of ISO settings supported by the camera and analyze the resulting images using Imatest. We also check noise and color reproduction under challenging low-light conditions, in a separate testing section below.
Noise – Manual ISO*(8.86)*
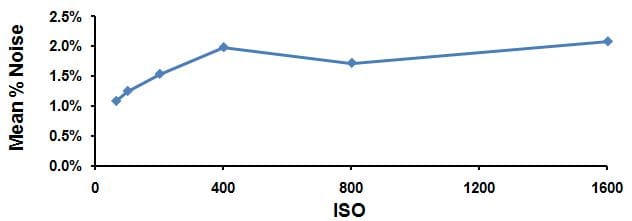
In our basic noise test we manually set the camera ISO to exmine the full available range. The Olympus 570UZ performed well in this test, starting out just above 1% noise and climbing up to 2% by ISO 400, but then leveling out (thanks no doubt to the unseen machinations of digital noise reduction processing) to keep noise from becoming truly objectionable at any point.
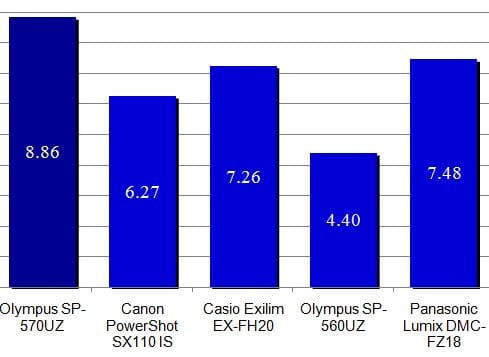
The Olympus SP-570UZ stands out from the competition here, including a tremendous improvement over the mediocre noise performance by its brand mate 560UZ.
Manual Noise Scores
The auto noise test is a kind of hybrid challenge. Here we let the camera's auto ISO system set what it considers an appropriate ISO level for our brightly lit chart, then analyze the noise present in the photos shot at that setting. Since noise inevitably rises as ISO increases, a low ISO both fits the lighting and produces lower-noise results. In this case, the 570UZ chose to shoot at ISO 125, pretty much ideal for the situation, resulting in a low-noise image and a decent score.
Auto Noise Scores
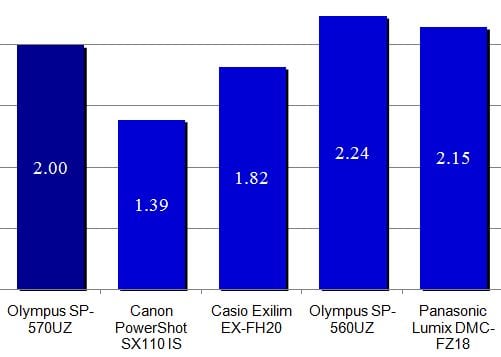
**Low Light **(6.56)
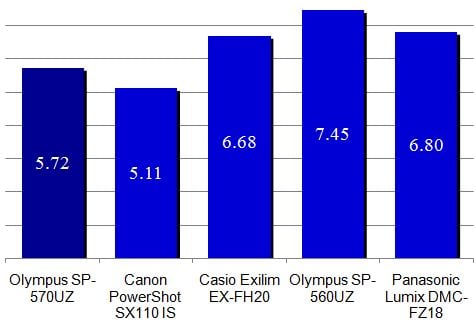
Our low light testing has two component parts. First we shoot our GretagMacbeth chart at a high ISO 1600, at four different lighting levels, ranging from 60 lux (roughly standard room lighting) down to 5 lux, which is about what you'd get from a single candle. The results are then scored for both color accuracy and image noise. The color accuracy charts produced by Imatest for the 570UZ are shown below.
The 570UZ performance under low illumination wasn't great. While the camera did very well in our image noise testing under bright illumination, changing the mood lighting and upping the ISO produced a substantial change in results. The color accuracy picture, as shown above, was more impressive, maintaining a reasonable performance even at the meager 5 lux lighting level, with good consistency as the illumination was lowered.
Our second low light test measures color accuracy and noise over long exposures. Unfortunately, there was no way to get a truly long exposure from the 570UZ at our ISO 400 testing conditions without causing the image to seriously blow out. We succeeded in running our test at four timings between 1 and 2 seconds, and the result was mediocre.

Taking the two tests together for a combined low light score produces a result that's not dramatically different from other cameras in this ultra-zoom class, but still statistically lower than the competition, including the relatively strong 560UZ.
Low Light Scores
Still Life
To provide a visual comparison between shots taken at the camera's various ISO levels, and a camera-to-camera comparison as well, we shoot the same two still-life setups for each review. These were shots under fluorescent lights, with the camera set for automatic white balance and exposure. Clicking on the thumbnails below will bring up the full-resolution images, though that may take a while if your Internet connection is on the pokey side.
**Video Performance ***(5.04) *
Odds are that when you're out and about, you'll be carrying either a still camera or a camcorder, but not both. Can your camera serve as a video recorder in a pinch? We put the 570UZ through a battery of tests to find out.
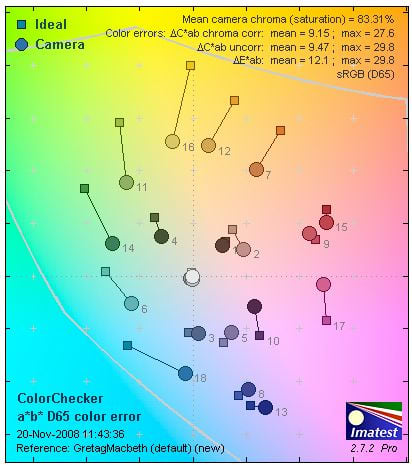
*Bright Indoor Light - *3000 Lux
We start out by shooting our color chart under very bright studio lighting – basically recreating the effect of outdoor sunshine – then grabbing still frames from the video and testing for color and noise performance using Imatest. The 570UZ did alright under bright lighting, basically matching the color accuracy and saturation results we found in our still photo testing, and maintaining image noise at about 1%.
**
****
**
**
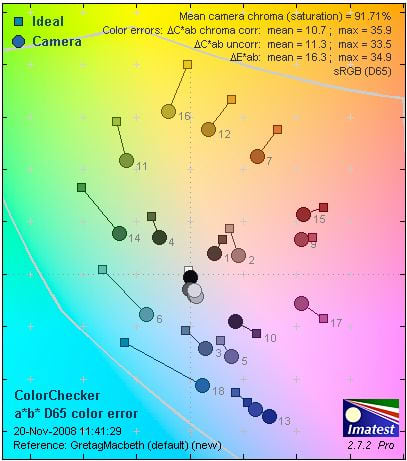
***Low Light - *30 Lux
Dimming the lights to a paltry 30 lux (which you might encounter when trying to grab embarrassing clips of your buddies in a cozy club) brought color accuracy down and more than doubled the image noise in the video. In addition to the saturation being low, the color hue accuracy shows noticeable deterioration here, particularly in the blues and greens. Not a disaster by any means, but the flaws are plainly visible.
***
*****Resolution ***(1.62)*
When shooting at 640 x 480 at 30 frames per second, the actual resolution maxed out at 513 lw/ph horizontally and 316 lw/ph vertically, producing an unattractive lack of sharpness.
**Motion **(0.75)
Icy winter cold couldn't keep us indoors when there are cameras to test. We bundled up and trundled over to a fast-moving local road to shoot cars zooming by, then played the resulting video back on a TV screen and looked for visible flaws. We didn't have to look hard. There was very noticeable stuttering as the cars passed our position, as if the back 20% of the car was repeating itself. There were other evident quality flaws, including uneven illumination and streaks where the sunlight glinted off the chrome. Not a pretty picture overall.
Video Scores
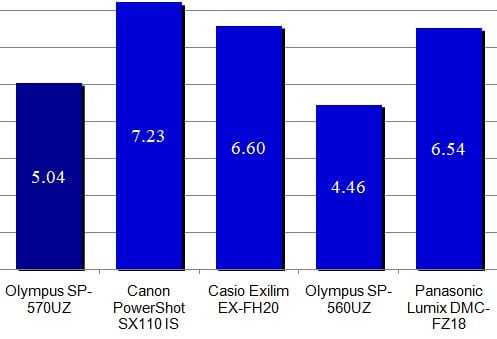
While it does show some improvement from its unimpressive Olympus predecessor, the 570UZ is still not going to endear itself to fervent YouTubers with its video performance.
Speed and Timing
**Speed/Timing
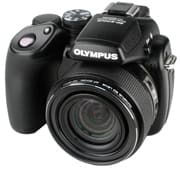
**No matter how eagle-eyed you are in finding unexpected photo opportunities, the shot will elude you if your camera isn't ready for fast response. We put the 570UZ through a battery of tests to determine whether its speed and alacrity are up to snuff.
**Startup to First Shot **(6.6)
The 570UZ took a long moment to get its digital senses in order and its long lens in position, averaging a none-too-quick 3.4 seconds between turning the power switch to 'on' and taking the first photo.
**
Shot-to-Shot ***(8.89)*
Continuous shooting at full resolution produced mediocre results, firing off roughly 1 frame per second and taking a break after the fourth photo to store the results into memory. It's worth noting that there are several lower-resolution burst modes, not considered in lab testing scores but worth knowing about (see the Burst Mode section below). We were particularly pleased with the option to shoot over 7 frames per second at 5-megapixel resolution, a speedy pace that's fine for sports and action photography at a resolution that will produce a decent print and a fine on-screen display.**
Shutter-Shot** (2.33)
The delay between the moment you press the shutter and the moment the photo is actually taken can be significant, especially if you're shooting fast-moving subjects. Our testing revealed a shutter-to-shot delay of about 0.9 second, a considerable stretch.**
Processing***(2.05) **
*It takes time after taking a photo for the camera to process the data and store it to the memory card, before you can take the next shot. For the 570UZ, that process takes on average over four seconds, which is a long time indeed when interesting goings-on are going on.
Components
Viewfinder*(8.25)*
The electronic viewfinder is a very handy option when shooting outdoors in bright light, when an LCD can be difficult to see. And with the 570UZ there's a secondary benefit: when you switch to the electronic viewfinder, the LCD can automatically switch to an interactive display that shows most camera settings, letting you move among them using the four-way controller and change settings quickly using the control dial.
The viewfinder display is quite bright – in fact, it boosts the brightness noticeably indoors, which can be useful if not entirely accurate. The view doesn't keep up entirely smoothly when you move the camera quickly, though, causing a noticeable blur. You wouldn't want to shoot a sports event this way, or you might find your lunch lurching.

What you see through the electronic viewfinder matches closely
with the area captured in your photo.
LCD Screen*(6.50)
*
The LCD screen measures 2.7 inches, with the typical 230,000-dot resolution. Olympus screens use what the company calls HyperCrystal technology, which allows light to pass through the outer layer and bounce back, further illuminating the image when in bright sunshine. The system does help in some circumstances, though in direct sunlight screen glare is still going to overwhelm the on-screen display.
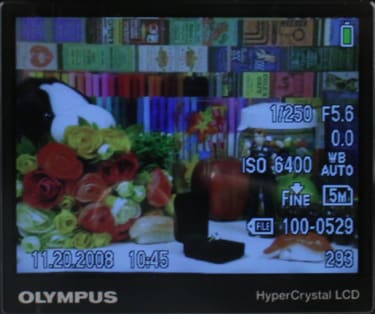
While using the LCD screen or electronic viewfinder to line up a shot, pressing the DISP button toggles between four information displays. The basic screen shows the current shooting mode, flash mode, ISO setting, metering mode, image size and compression settings, aperture, shutter speed battery charge and additional icons as appropriate. Pressing DISP once clears the screen of everything except the battery icon. Another press returns the shooting information and adds a lined grid overlay (if you've enabled the overlay in the Setup menu, which offers two grid design choices). A final press clears the grid and adds a histogram display.
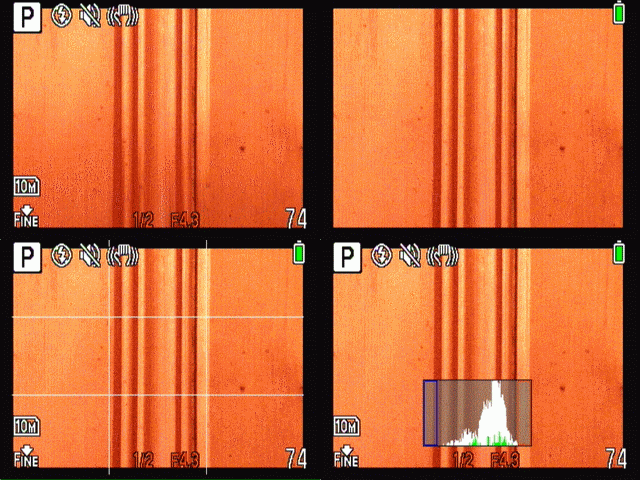
The rear display toggles between four display modes while shooting.
**
Flash *(*8.00)
When it's popped open, the center of the built-in flash sits approximately two and a quarter inches above the center of the lens, enough to keep red-eye to a minimum. Of course, there's a red-eye reduction flash mode that pre-flashes into your subject's face to tighten up the iris and cause unpleasant facial expressions. Additional flash modes include auto, fill-in (always-on), fill-in with red-eye reduction, slow synchronization and slow synch with red-eye reduction. The slow synch settings are designed to fire the flash to illuminate subjects in the foreground, then hold the shutter open longer to capture the darker background scene. In addition, the 570UZ offers a second slow synch mode which fires just before the shutter closes, mostly useful on those rare occasions when you want to catch the car-lights-streaming-backwards effect.
The flash works well, with good power and more even illumination than we're used to with built-in flash units; there was some light fall-off around the edges when shooting a blank wall but not much, and no discernible hot spot. The flash recycles quickly. On a fresh set of AAs, it was ready to fire again by the time the previous image had been stored to memory (admittedly a little slow on this camera in the first place, but that's not the flash's fault).
Flash output intensity can be adjusted through the menu system, in a range of ± 2 EV. It's a useful feature, but buried 11 clicks deep in the camera menu, and for some strange reason not available for mapping to the custom function button in the four-way controller group.
In addition to the built-in flash, there's a hot shoe for connecting an external flash unit, plus compatibility with the Olympus wireless radio-controlled flash system.
**
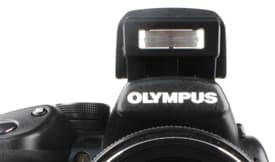
The flash covers a wide area with even illumination.
**
Lens**(13.75)
The 20x optical zoom lens is, of course, the be-all and end-all of the 570UZ. The range is 4.6mm-92 mm (which equates to 28mm-520 mm in 35mm photography). For practical photographic purposes, that 28 mm spec is as important as the tremendous telephoto side of the equation, since you need that wide angle both for capturing scenic vistas and for squeezing everybody into a picture when shooting in close quarters. There's good news on the lens speed side too, with a range of f/2.8-f/8.0 at the widest setting and f/4.5-8.0 at maximum telephoto. That means the lens is quite fast at close range, making available-light photography more practical, and even at the furthest zoom you still have a fairly wide aperture, making faster shutter speeds possible. Combined with the built-in sensor-shift image stabilization system, we found it perfectly practical to take handheld long zoom shots without visible blur.

No, we didn't walk down the street and take pictures. We just stood in one spot and let the 20x zoom do the work.
Unfortunately, there is one major flaw in this otherwise happy story, and that's the way the zoom lens handles. It looks like a standard SLR zoom, and the zoom control ring around the barrel looks and feels like an SLR zoom would... but looks are deceiving here. Turning the ring doesn't directly move the lens elements. Instead, it engages a motor that zooms the lens, which adds up to a sloppy, inexact control that even sounds bad as it does its business. The gearing means that you can move the barrel a smidgen and nothing happens at all, then another tweak and you zoom past the precise point you wanted. It's not a deal breaker for the camera, but it is annoyingly imprecise, particularly if you've ever worked with an SLR telephoto lens.
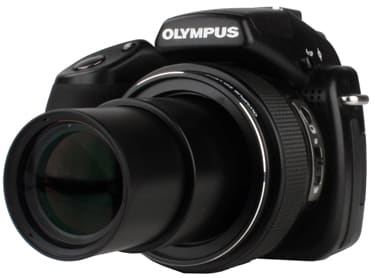
This formidable snout collapses down to leave the camera
only about 3 inches deep for portability's sake.
Two forms of digital zoom are also supported. Standard digital zoom bumps up magnification by factor of 5x (transforming the maximum zoom to a mind-boggling 100x), though image quality suffers noticeably when you start letting the camera mathematically jigger with your photos to create artificial zoom effects. If you're willing to trade image resolution for enhanced zoom range, the Fine Zoom feature enables up to 30x zoom without the image defects caused by mathematical monkey business, by using only the center section of the image sensor to increase magnification. However, the largest resolution available in this mode is a meager 3 megapixels, making it less than appetizing for most situations.
There are also two forms of image stabilization, always-on sensor-shift stabilization and ISO-boosting digital stabilization that can be turned on and off.
Design / Layout
Model Design / Appearance*(8.00)*
The 570UZ design is basically digital SLR lite; the top is a bit more streamlined since there's no need for an optical viewfinder hump, but otherwise this could easily be an SLR with a snub-nosed lens. with a smooshed top where the viewfinder hump would be, We have no problem with that design philosophy at all. It means the camera handles the way an SLR does, which is a fundamentally good thing. And the combination of sloping platform for the shutter, beefy grip and nicely sculptured curves make this a camera we're glad to be seen carrying.
Size / Portability*(7.75)*
At 4.7 x 3.3 x 3.4 inches (118mm x 84mm x 87.5mm) and 16.7 oz. (445g) before batteries, this is a substantial camera, but feels quite light in your hand because there's not much weight for the bulk of the body. At the same time, it doesn't feel insubstantial or cheap. We carried the 570UZ in a leather business case, along with lots of paperwork and a laptop computer, while taking test shots on a recent trip, and found it entirely manageable. If you insist on a camera that fits in your pocket, of course, this isn't going to fit the bill, but when you consider that a lens with this range of magnification on a 35mm camera would require a case, a tripod and quite possibly a hernia exam after a long day of shooting, the size and portability equation comes out heavily in favor of the lightweight 570UZ.
Handling Ability(9.00)
Olympus did an excellent job building a body that feels secure in your hand at any angle. The sculptured design is partly to thank, with the substantial rubberized grip in the front and the perfectly positioned thumb rest, also with a rubber pad, directly behind to create a rock-solid handhold. The weight of the camera also works in its favor: you're really not fighting gravity much as you move the camera around. Finally, the balance is right, with the weight of the batteries in the grip helping to anchor the camera in your right hand while the left side stays light and readily movable. In short, when it comes to the mechanics of handling the camera, the 570UZ is just a pleasure to shoot with..
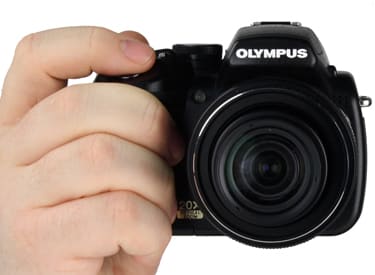
*
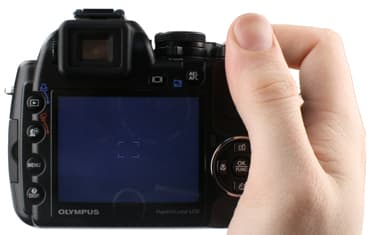
-
Working with the 570UZ is exceptionally fast and comfortable.
**Control Button / Dial Positioning / Size ***(9.75)*
Camera controls are well designed and conveniently placed, for the most part. The shutter and exposure compensation controls placed on an inclined platform, with the control knob for adjusting exposure comp right behind them, makes fast adjustments simple. The mode dial snaps into position authoritatively, and the power switch is within easy reach of your thumb.
The row of four buttons along the left side of the LCD mostly makes sense, though we would have swapped the position of the MENU and DISP buttons so MENU was at the bottom. Clearer labeling of the erase button (the second one down, which does double duty controlling the shadow adjustment function while shooting) would also be welcome. The only truly odd button placement is the continuous shooting mode control, which is located on the lens barrel. instead of the camera body for no logical reason; guess they just ran out of real estate. All the camera buttons have a nice feel to them: easy to push but with enough resistance to let you know you've entered a command.

Buttons are well placed and feel good, but the blue and red
labels are hard to read on the black camera body.
There's a single programmable button, prominently placed at the top position of the four-way controller cluster. We appreciate the thought, though as noted elsewhere in this review, we have some quibbles with the implementation. The following functions can be bound to this programmable button, by way of the Setup menu:
Image Quality
Image Size
Compression
Fine Zoom
Digital Zoom
AF Predict.
Image Stabilizer
Flash (Int/Ext, RC or Slave)
Still photo audio annotation
Noise reduction
The oddity is that several shooting-mode adjustments that might realistically be useful to access with a single button press aren't available here. Why not offer one-click access to ISO settings instead of bringing up the camera menu? One-button access to the white balance setting system, or the white balance manual adjustment feature, would certainly be more useful than an express route to external flash modes or digital zoom settings.
The My Mode system, on the other hand, is well conceived and executed, with one small exception. Available through a dedicated spot on the mode dial, My Mode lets you store four sets of shooting settings, including every option in the camera menu plus a few from setup: we couldn't think of an additional option we'd add to the mix. The system is easy to use, too. If you have the camera working just the way you like it, save those settings to one of the four My Mode slots. Alternatively, you can visit the My Mode Setup section of the Setup menu and click through the camera options directly. As for accessing your stored modes, you can use the Function Menu or Control Menu when the mode dial is set to My Mode, available by pressing OK while shooting. Here again, we have a camera function that could be helpfully mapped to the custom button in the four-way group... except you can't. Are you picking up on a trend here? More important, though, is the inability to change the name of the mode you've created to provide some idea of what's hiding behind the generic label.
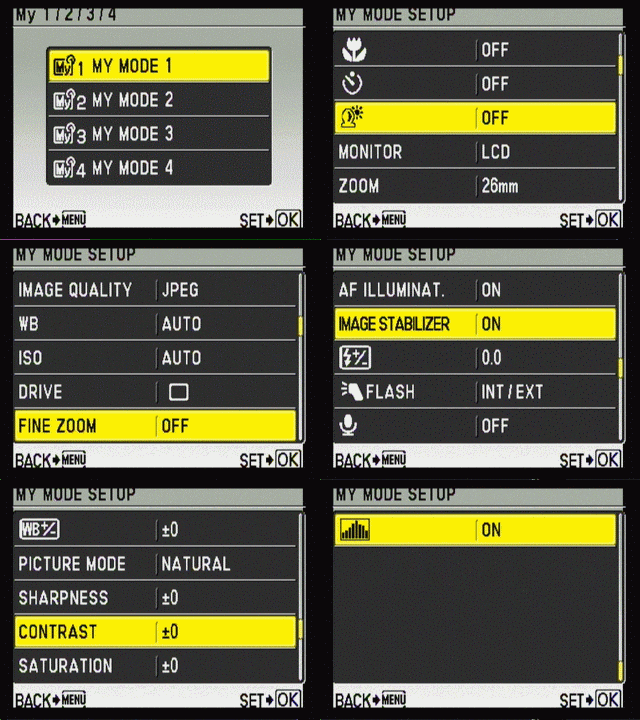
A cornucopia of settings can be stored
in each My Mode group.
Menu (6.50)
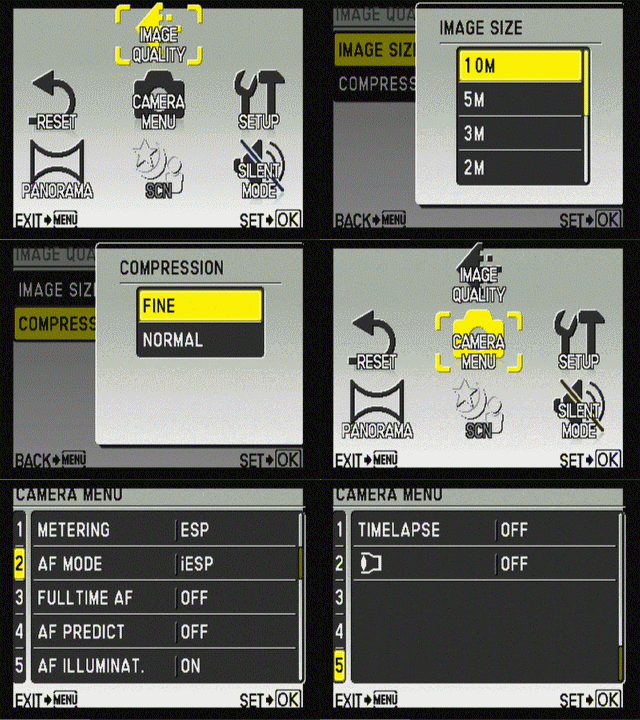
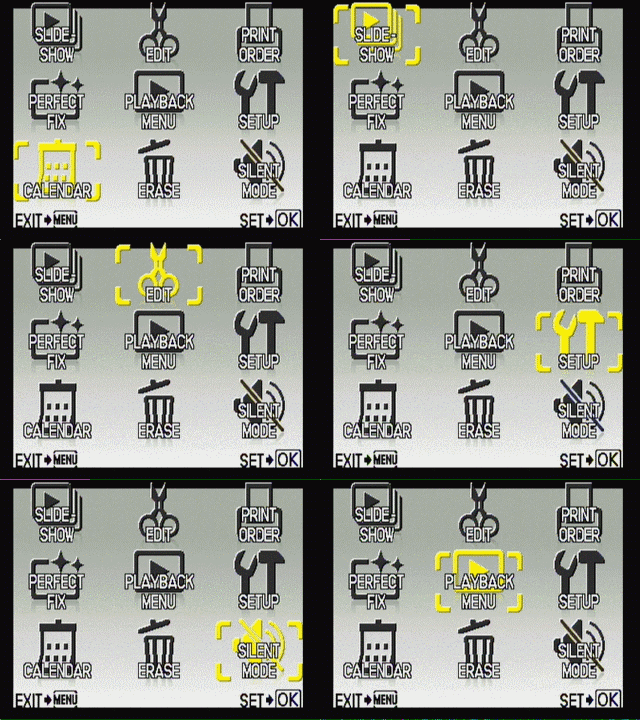
The 570UZ maintains the same menu structure as you'll find on simpler Olympus point-and-shoot cameras, which has its pluses and minuses. Instead of launching into a tabbed menu structure, or a single long list of setting options, pressing Menu takes you to an intermediate icon-based display with nine available slots. The still photo or video modes share one icon-based home screen, while Playback mode has a different one, both with the identical Setup submenu in the same 3 o'clock position. The screens are easy enough to read, with text labels supplementing on-screen icons for clarity's sake. What's unclear is why certain items are placed where they are. In the Record menu, for example, Image Quality is given a top-level berth, even though you'll probably set it once and forget it. while more frequently used settings for white balance and ISO require a trip to the Camera Menu subsection. In the Play mode menu, most of the image-altering functions are grouped in an Edit submenu, but Perfect Fix (an automated boost for dark subjects) is positioned on the top level, and image rotation is found in the Playback Menu subsection rather than Edit.
Having a Silent Mode option at the top level of the menu system is potentially useful, if you're the type you fluctuates between wanting the camera to chirp, beep and otherwise pester you sometimes, and keep blissfully silent at other times. We used it once to shut down the audio, and that was the end of that.
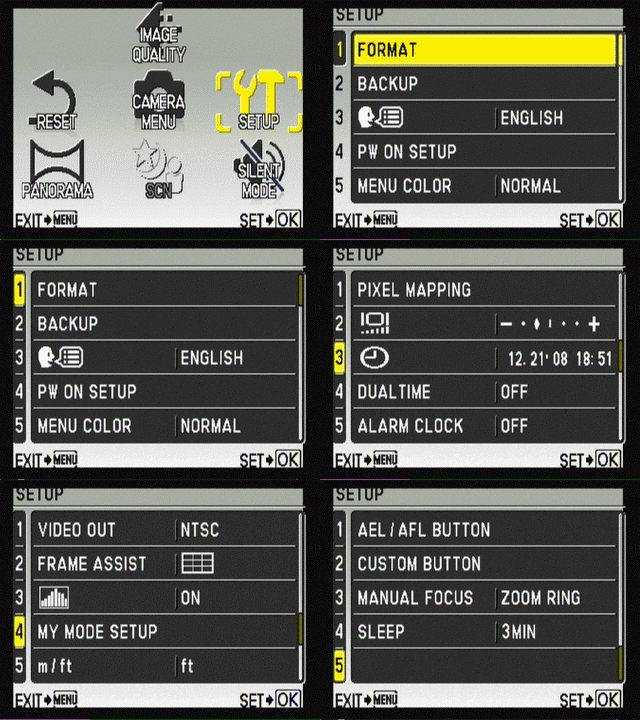
The Camera and Setup menus are quite long, with over 20 settings each, organized in successive 5-items screens. Cursoring down through all these options to reach those on later screens is time-consuming, though there is a shortcut once you notice it: pressing left on the four-way controller lets you skip down a full screen at a time.
For all the on-screen menus, additional information is available by pressing and holding the DISP button. The on-screen text that's presented is terse to the point of worthlessness. The explanatory text for Metering reads 'Sets picture brightness for taking pictures.' And then there's our favorite: the cryptic menu item Picture Mode is defined 'To adjust how images are produced.' Text-based help a button-press away is potentially very worthwhile, but you have to get it written to get it right.
The saving grace of the entire record mode menu system are the Function or Control Panel quick-access menus that appear when you press the OK/FUNC button (you set whether you want to use Function or Control Panel in the Setup menu). The more useful of the two is Function, which brings up an L-shaped overlay, leaving the scene you're shooting visible in the background. Using the four-way controller, you now have easy access to the settings for white balance, ISO, metering mode, image size and compression setting. We found ourselves using this screen all the time during our lab testing and shooting out in the field. For a camera that lacks dedicated buttons for ISO or white balance, this system is nearly as fast.
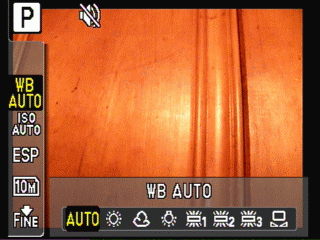
The Function display puts key settings at your fingertips.
The alternative Control Panel display takes over the entire LCD, switching the current view to the electronic viewfinder. This feels more like SLR shooting, and provides fast access to a much wider variety of settings, including items such as flash intensity, saturation, sharpness and contrast settings that are otherwise buried deep in the menu structure.
The Control Panel mode offers a wider array of settings,
but is more difficult to navigate than the Function display.
**Record Menu
**The Record Mode menu includes image quality and panorama shooting options on the top screen, a SCN (scene mode) option that is greyed out unless you're in that mode when you call up the menu, and most of the key shooting settings one level down in the Camera Menu.
**Play Mode Menu
**The Play mode menu offers a calendar view of your stored photos from the top level (the same view is available by zooming out repeatedly during playback). Multi-image erase, the Perfect Fix image adjustment, slide show utility and direct print options are also positioned at the top level. Most but not all of the important features here are choices within the Edit Menu, with the Playback Menu home only to image protection, rotation, voice annotation and the Index Play movie playback option.
Setup Menu
This menu includes a daunting 23 options one after another, some of which are basic system-level settings like date and time, others which are clearly relevant to one mode or another. The frame assist grid choice, for example, is used exclusively during shooting, but stuck out here in Setup land rather than the Camera Menu.. **
**
Ease of Use (7.00)
The 570UZ is certainly easy enough for point-and-shooters to embrace: just leave the mode dial on Auto and go to town. Accessing the more sophisticated camera functions requires getting used to a menu structure that is somewhere between quirky and just plain odd in its organizational structure. After a day or so, we'd developed a fluid shooting style with this camera: use the Function overlay for frequently changed settings, the programmable Custom button for quick access to settings particularly relevant to today's shooting, and store frequently used setting combinations in the My Mode system. If that sounds like there's a learning curve, you're hearing us right, but we think the results are worth the effort.
Modes
Auto Mode (5.50)
The 570UZ offers the typical two-level automated-mode configuration. The full Auto mode sets exposure and locks out control of most other functions. The Camera menu, which includes settings for white balance, ISO, auto focus, metering and drive modes and so on is locked out, so only image size and compression and exposure compensation settings can be changed. For basic exposure automation with the camera control menu functions enabled, Program mode is the way to go. Both mode choices are available via the top dial.
**Movie Mode ***(7.75)*
Video can be shot at 640 x 480 or 320 x 240 resolution, at 30 or 15 frames per second. Audio recording can be set on or off: with audio turned, off, the optical zoom is available, enabling people very, very far away from the camera to be ready for their close-up. Unfortunately, the zoom movement tends to be herky-jerky, making those dramatic telephoto zoom effects you may envision problematic. If sound recording is turned on, digital zoom is still available. On the plus side, many image capture controls, including white balance, metering mode and sharpness/contrast/saturation adjustment, are available while shooting video.
It would also be helpful if the manual reminded users to turn on full-time auto focus when shooting video: without it, video with zoom or even moving subjects turns into a blurry mess.
Three editing utilities are available during movie playback. Index creates a nine-image composite of thumbnail images drawn from a section of the video you select. Edit lets you save a section of a video you shot, either overwriting the original or saving it as a new file. And Movie Index lets you save a selected video frame as a JPEG image. An unusual playback option we like is Index Play, from the playback menu. Index Play shows thumbnail views of frames taken from the entire span of your stored video and lets you choose where you'd like to start playback, letting you skip the boring parts and get right to the good stuff when you grab your buddy to show off a goofy video you've shot.
Drive / Burst Mode*(7.75)
*There is a nice variety of burst mode options, starting with normal sequential shooting, which locks the focus when the first frame is shot and fires as fast as it can based on image size. In our lab testing, at full resolution, we got roughly a single shot per second in this mode.
There are two resolution step-down options to speed burst mode performance, Hi 1 mode sets resolution to 5 megapixels and, while Olympus doesn't provide a speed estimate, gave us about 7 frames per second, a nice clip at a resolution that's perfectly fine for most purposes. Continuous shooting in this mode is limited to approximately 20 photos when shooting in Fine compression mode.
Hi 2 cuts resolution to 3 megapixels and promises a blistering 13.5 frames per second – we actually did slightly better, at about 14.3 fps. With Hi 2 you also get the option to turn on pre capture, which keeps 10 frames in a buffer continuously when the shutter is held down halfway, then begins adding to this group when the shutter is pressed down entirely. Total shooting in a burst in Hi 2 mode is limited to approximately 30 shots.
But wait, we're not done yet! There's also a continuous shooting mode that auto focuses between each shot, obviously slower than the other versions, but potentially very useful. And finally, there's exposure bracketing, The user chooses the exposure variation between shots (± 0.3, 0.7 or 1.0 EV) and the number of frames and the camera does the rest.
There is also a self-timer feature, accessed not through the continuous shooting settings but via the bottom button in the four-way controller cluster. The self-timer can be set to 12 seconds or 2 seconds, after which a single photo is taken. Some compact cameras can take multiple photos when the timer goes off, a nice option when you're running like a crazy person to get into position for a group photo and would like a few shots to choose from. Also, the self-timer cancels itself after each shot, so if you're planning to shoot a series of photos using this capability (not uncommon when shooting still life setups, to avoid camera shake when pressing the shutter), you're stuck resetting the self-timer for each photo.
Banished from the other time-oriented settings to the hinterland of the fifth camera menu screen is Time lapse shooting, a distinctly fun extra. You can choose how many photos you'd like to shoot (from 2-99) and the interval between shots (from 1-99 minutes, in 1-minute increments). Pressing the shutter starts the sequence, and then the camera takes care of the rest. In a perfect world, you'd have the option to use this feature to not only take a sequence of stills, but a time lapse movie as well. No such luck, though it's simple enough to drag-and-drop the stills into even a rudimentary video editing program if you're so inclined.
**Playback Mode ***(10.00)*
While in playback mode, the control dial is used to enlarge the image in ten steps, up to 10x zoom, which is fine for critically judging focus accuracy. Pressing the OK button while zoomed in returns to full-size display instantly, a handy feature that ought to be standard in the digital camera world, but isn't.
Turn the dial in the opposite direction and you get a series of thumbnail image displays (4, 9, 16 and 25 imagers per screen), followed by a calendar display that sorts the photos on the memory card by date taken.
During playback there four available views, the first of which shows date and time the photo was shot, image size and compression settings, file name and number. Pressing DISP adds aperture and shutter speed, exposure compensation, ISO and white balance information. Another press removes the information overlay entirely, while the last display offers basic image information with a thumbnail of the photo and a histogram below it.
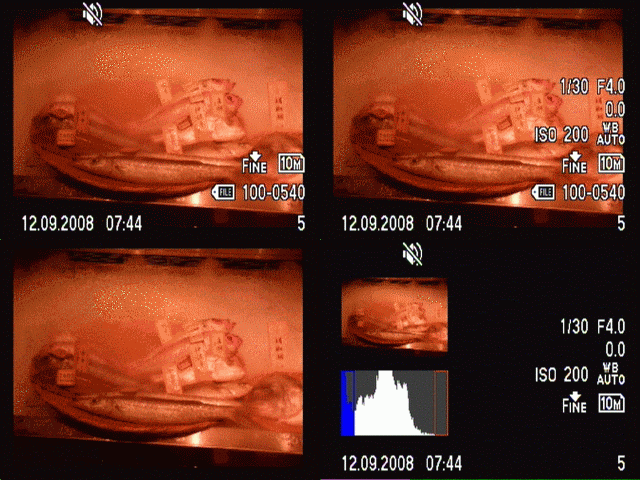
The playback display offers four information layouts.
The included slideshow utility is peculiar. It offers a choice of eight between-image special effects and two different kinds of background music, but doesn't let you select which photos to include in the show, or how long an interval should pass between photos. Mighty strange.
The play mode menu offers an alternative to the one-at-a-time image erasing procedure accessed via the control buttons. The play mode menu version lets you erase all images at once, or choose a set of images to be erased by browsing on-screen thumbnails. Protect, which prevents images from accidental erase, is also available.
Custom Image Presets*(9.00)*
Olympus combines two approaches to the task of providing a helping hand to budding photographers interested in venturing beyond auto mode, but still unsure about combining camera settings effectively.
First is the familiar Scene Mode system. Turning the Mode dial to SCN provides access to 23 preset scene modes. Many are self-explanatory – portrait, landscape, fireworks, sports, sunset and so on – but a few bear closer scrutiny.
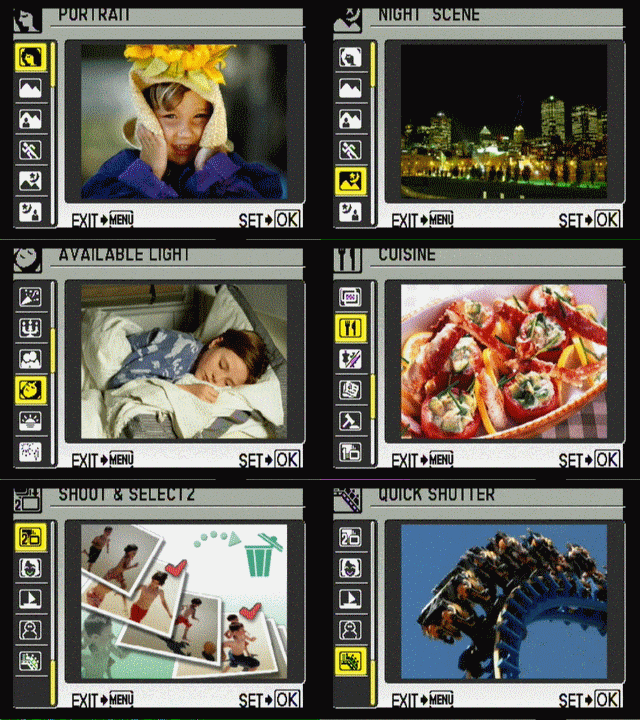
Scene modes cover a wide range of shooting scenarios.
Night + Portrait: uses the slow synch flash function to capture subjects in the foreground, then keep the shutter open to expose for the darker background.
Multi Fireworks: In addition to the usual Fireworks mode, Multi Fireworks allows multiple exposures to produce a composite image of several big bangs and booms.
Shoot & Select: There are two continuous-shooting scene mode variations. The first lowers the resolution to 5 megapixels and uses the faster Hi 1 burst mode. When you take your finger off the shutter, the camera automatically displays all the shots you just took and allows you to choose which ones to keep and which to discard. The second Shoot & Select variation works basically the same way, but maintains full-resolution and a slower one frame per second burst rate.
Smile Mode: After selecting this mode, the camera waits until the face recognition system detects a smiling puss in range, then fires off three shots in rapid succession. Pressing the shutter button will still take a photo, in case waiting around for a cheerful expression seems hopeless.
Quick Shutter: Turns on continuous auto focus, shortening the delay between the shutter being pressed and a photo taken.
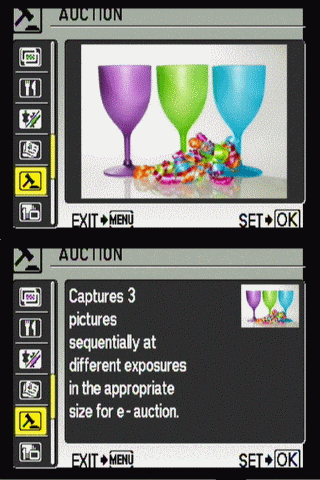
On-screen text messages briefly explain scene modes.
The other system used to provide training wheels for the user is Guide mode (available from the mode dial), a series of plain-English prompts that makes advanced features available without a lot of technical understanding. Most of the choices in the 16-choice Guide are simply easy-to-use front ends to basic camera settings. For example, choose 'Shooting into backlight' and you get three choices: Set to fill-in flash, Set the metering to spot and Increase the value of exposure compensation. The exception is 'Shoot w/ effects preview' which goes a step further, dividing the display into four thumbnail segments and previewing the effect of changes to exposure compensation, white balance, metering mode and movie frame rate settings in each.
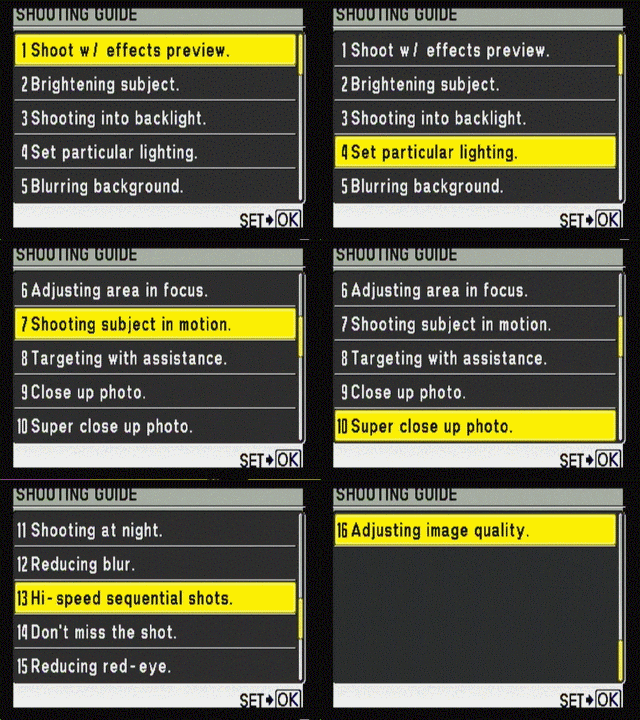
Guide mode lets you read your way to better pictures.
A separate shooting mode, located as a top-level choice in the Record menu, is panoramic shooting. There are three available variations. Combine in Camera 1 automates the process. After taking your first photo, a target marker appears on screen to the left or right. Line up an on-screen pointer with this target marker and the camera automatically takes a second shot. Repeat the same procedure one more time and the camera takes charge, combining the images and saving the result. Pressing the Menu button after the second shot lets you take a two- rather than three-image panoramic shot.
Combine in Camera 2 expects you to line up each shot manually. After the first photo is taken, a reference section of the image remains visible at the edge of the frame for you to line up the next shot. After taking the third photo, the camera stitches them together and saves the panoramic result.
Finally, Combine in PC stores separate images to be stitched together on your computer later using the included OLYMPUS Master 2 software. You get more control over the completed panorama here, with the option to combine photos shot by panning vertically as well as horizontally, and joining up to ten photos into a single massive image. You don't get any help lining up consecutive images when shooting in this mode though. You just eyeball the alignment and let the computer software figure out how they all fit together.
Control Options
Manual Control Options
Manual exposure controls work nicely, with enough options to allow thoughtful fine-tuning of your shot. The only real disappointment here is the manual focus system – it's nice that manual focus is available at all, but the controls could use some work.
Focus
Auto Focus (7.75)
The default iESP mode attempts to determine the subject of the photo by analyzing the scene and focuses accordingly. Spot focus limits focus to the auto focus target mark in the center of the screen, while Area auto focus lets the user move the auto focus mark using the four-way controller. Face detect mode is also available, which identifies the people in a scene and sets focus and exposure accordingly.
Full-time auto focus is available in both still and movie modes, maintaining focus without requiring the shutter button to be depressed halfway. Of course, this mode will wear down batteries more quickly, and produces a noticeable ongoing vibration as you move the camera around which we find unpleasant.
AF Predict attempts to keep a moving subject in focus as you keep the shutter half-pressed. We had mixed results here, with a swinging ball on the end of a rope tracked fairly well but a speeding dog and a panning camera just too much for the system.
There are two macro mode settings, available by pressing the rightmost button in the four-way controller group. Regular macro mode allows focusing as close as 3.9 inches (10 cm) from your subject. If that doesn't fill the screen sufficiently, there's Super macro mode, which lets you cozy up as close as 0.4 inch (1 cm) from your target, if you can somehow manage not to block the light at that nearly-touching range.
In all focus modes, the auto focus illuminator can be switched on or off. It's a red LCD light with a good long range, and with its assistance we found low-light auto focus quite speedy.
Manual Focus (5.50)
Switching between auto and manual focus is simple: just flip the switch on the left side of the lens barrel from AF to MF. Using the manual focus system with any accuracy is a bit more difficult.
You can choose one (and only one at a time) of three options for controlling manual focus: the left and right buttons in the four-way control cluster, the control dial or the zoom ring. Of course, any one of these decisions knocks out another frequently used control during the focus process. Use the zoom ring for focus and you can't zoom the lens. Use the control dial and you can't adjust aperture or shutter values for manual exposure settings. Choose the four-way control buttons and the options ordinarily associated with those buttons (macro and flash control) are unavailable. So, to get around this boondoggle, Olympus created another one. You have to toggle in and out manual focus mode by pressing and holding the OK button. Hold it down for a few seconds, manually focus, then hold OK down for a few seconds again and your focus is set, and the buttons perform their ordinary functions. If you mistakenly just press OK rather than press and hold *OK, you get the LCD control menu instead. And to make matters worse, whichever control method you choose for adjusting focus manually is clumsy, imprecise and tedious. The only bright spot: while manually focusing, the center of the image is magnified on screen to offer a very good image of the present state of focus affairs. It's a nice gesture, but it doesn't really make for a system you'd use unless the auto focus system absolutely couldn't cope with current shooting conditions.
*
ISO** (9.000)
ISO settings range from 64 to 6400, with one caveat: the top two settings (3200 and 6400) knock resolution down from 10 megapixels to 5. There are two Auto ISO settings, standard and High ISO, which boosts ISO to minimize the effect of camera shake.
White Balance (9.00)
In addition to Auto, the 570UZ offers six white balance presets (daylight, cloudy, incandescent, and three flavors of fluorescent) and the option to take a live reqading by shooing a neutral card under current lighting conditions.
There's also a manual white balance adjustment available through the camera menu. It's not exactly the kind of precision tool you'll find on some high-end SLRs, but it is very easy to use: there's a bar with 15 settings on a blue-to-red axis, and as you move the pointer with the four-way controller, the changes are reflected on screen. Here again, though, we have a control that would make perfect sense to map to the custom control button, but it can't be done. Instead you have to maneuver to the 15th item in the camera menu to access this manual white balance adjustment.
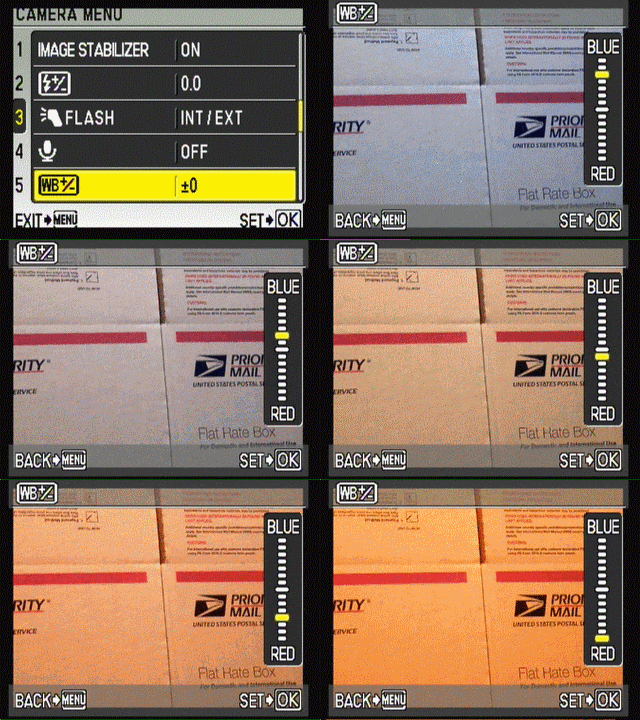
Exposure (7.00)
The 570UZ provides the full complement of aperture-priority, shutter-priority and full manual exposure controls, all available via the top Mode dial. The Control dial, to the right of the Mode dial, changes the selected variable easily in aperture- or shutter-priority modes. In full manual, with only one control dial available, you have to press the exposure compensation button near the shutter to toggle between setting aperture or shutter. The on-screen display highlights the selected function, displays the current exposure value above or below the ideal numerically in 1/3 EV increments, and brightens or darkens the screen interactively to show the impact of settings changes.
Exposure compensation is available in the ±2 EV range, in 1/3 EV increments. The setting is managed by holding down the exposure compensation button (behind and to the left of the shutter) with your index finger, then turning the control dial with your thumb. Changes are reflected in the on-screen image as they're made. It's a fast, efficient system, much easier than burrowing down through the menu system.
The AEL/ AFL button can be set to lock auto focus, auto exposure or both, using the Setting menu.
Metering (6,75)
There are three available metering modes. ESP doesn't actually set the exposure based on psychic readings; it stands for Electronic Selective Pattern, analyzes the full frame and attempts to create a balanced exposure favoring what the system calculates to be the subject of the photo. Spot metering reads only at the auto focus point, while center-weighted metering reads a wider but still limited area in the middle of the screen..
Shutter Speed (8.75)
Shutter speeds are adjustable from 1/2000 second up to 15 seconds. There is also a Bulb setting that keeps the shutter open for up to 8 minutes, as long as the button remains depressed, though Bulb shooting is only available with the camera set to ISO 64, an odd limitation.
Aperture* (7.00)*
The available aperture range varies depending on the zoom lens position. At maximum wide angle, apertures range from f/2.8 - f/8.0; at maximum telephoto, it's f/4.5 - f/8.0. We're impressed with the large available aperture at both ends of the spectrum. At f/2.8, you're much more likely to get away with a flash-free shot in available light than with the typical f/3.5-or-thereabouts compact camera lens. And an f/4.5 aperture helps eke out higher shutter speeds when shooting with the equivalent of a powerful 520mm telephoto, making blur-free telephoto photography more practical.
Image Parameters
Picture Quality / Size Options (7.00)
Seven image size options are available:
10MP (3648x2736)
5MP (2560x1920)
3MP (2048x1536)
1M (1280x960)
VGA (640x480)
16:9 (1920x1080)
There are two JPEG compression settings, Fine and Normal. The camera also offers uncompressed RAW file storage, either alone or with a simultaneous JPEG image capture. There is a price to pay for shooting RAW, though, beyond the large file sizes (over 14 megabytes for a full-res image). There's a long delay after shooting a RAW file as it's stored to the memory card before you can shoot again. We clocked it at about six seconds, which feels like an eternity if you're shooting in an active situation.
Picture Effects Mode*(4.75)*
There are two Picture Mode settings while shooting, Natural and Vivid. In addition, sharpness, contrast and saturation can all be adjusted on a 10-step scale through the camera menu. These settings would be a whole heck of a lot more useful if you could see an interactive preview of the effect of changes, but it was not to be. Instead, you have to tweak, shoot, review, tweak again if you like and so on and so on and so on and so on. On the bright side, if you do find combinations that suit your style, this is a perfect opportunity to put the My Mode feature to use, storing four sets of camera settings and accessing them via the mode dial.
Playback mode provides a variety of image editing and photo manipulation options, some straightforward useful, some seemingly aimed at elementary school arts and crafts projects. These include:
Resize: only 640 x 480 and 320 x 240 options are available, which seems pretty low-res even for emailing purposes
Cropping: Only seven size options (four horizontal, three vertical), but still moderately useful
Color Edit: Four choices are offered, including black and white, sepia and two saturation adjustments
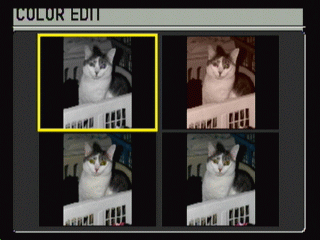
You can choose from four color effects, but can't
actually edit the colors in your photo.
- Frame: Holds the distinction of offering some of the ugliest retro-70s designed frame overlays on the planet
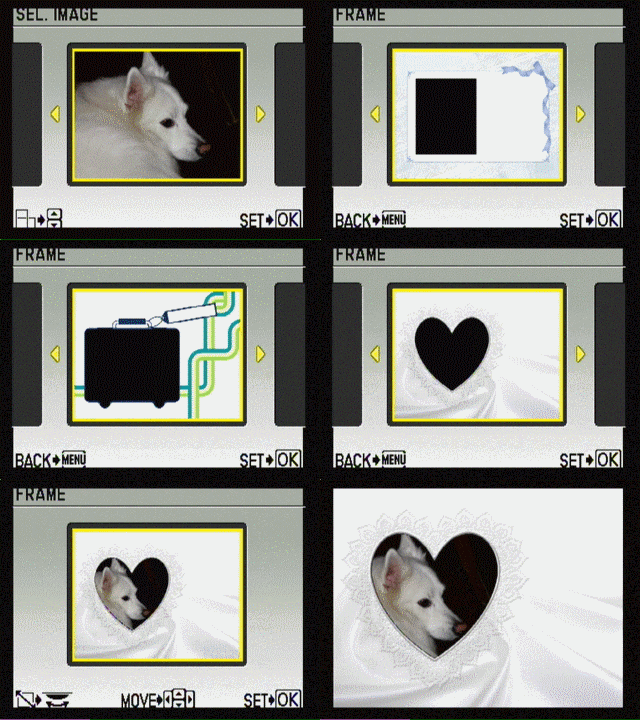
Frame choices seem beamed in from another era.
Labels: An assortment of ten canned text overlays, including Missing You, Congratulations and Thank You, which can be rotated, resized repositioned and colored in a multitude of shades.
Calendar: Creates a ready-to-print calendar page with your chosen image, in your choice of eight layouts. Kinda hokey, but we like it.
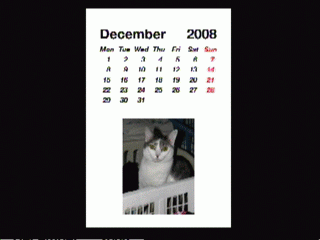
Do-it-yourself calendar pages are easy to create.
Layout: Sets up a page design with several images on a page, or an image with room for a caption. Six layout choices, potentially useful.
Expression Edit: Creates four altered versions of a portrait, adjusting the mouth into shapes that change the facial expression in weird and unnatural ways. Can you say 'creepy'?
Face Focus: The camera chooses what it believes is the most important face in a group shot and blurs out the rest of the photo. A truly awful effect.
Image rotation is also available, but from the playback menu rather than the edit menu, for no apparent reason.
In-camera raw file editing is also provided. Adjustments can be made to image quality, white balance setting, manual white balance adjustment, picture mode (natural or vivid), sharpness, contrast and saturation.
The automated Perfect Fix utility has two components, redeye fix and lighting fix: you can choose to use one or both. The lighting fix attempts to brighten dark areas of images, whether caused by backlighting or lack of illumination. There is no user control over the way the utility works, and we found the results unattractive. On the plus side, the attempted fix is saved as a separate file, so your original is left unchanged.
Connectivity / Extras
Connectivity
Software (6.50)
The 570UZ comes bundled with versions of the Olympus Master 2 suite for both Windows and Mac, and a measly 15-day trial of Muvee, an automated movie editing program for Windows (try to control your jealousy, Mac mavens). We don't usually think much of the software tossed into camera boxes, but Olympus Master 2 will be worth installing for many people. The image organizing and viewing functions look good and work well. There's support for automated photo email creation and YouTube uploading, along with wide-ranging photo editing options including automated and manual adjustment of brightness and contrast, color balance, hue and saturation, image sharpening, and even lens distortion correction (particularly useful in this case, since the ultra-zoom lens does cause noticeable pincushion and barrel distortion at the extremes of its range). Panoramic image stitching is also available in the program. Olympus Master 2 still won't let you handle the kind of pixel-by-pixel and area-by-area corrections available through more sophisticated image editing programs, but on the whole-photo-fixing level, we like this program.
Jacks, ports, plugs (1.5)
Both I/O ports are located under a tight-fitting rubber door on the left side of the camera. There's a DC in connection for using an optional adapter, and a single proprietary jack for the included USB and video out cables.
Direct Print Options (4.75)
The 570UZ provides a surprisingly sophisticated implementation of PictBridge technology, which allows direct, computer-free printing from the camera to a compatible USB-connected printer. In fact, there are two in-camera printing utilities, Easy Print and Custom Print. Easy Print outputs a single copy of the photo currently displayed in playback mode, using the printer default settings. Custom Print lets you choose multiple images for printing, set image size, border or borderless output, and the number of copies of each. Photos can include the time and date taken and/or the filename printed as overlays. Cropping is available through the printing system (you can also crop through the Edit menu in playback mode). Finally, you can also combine several images on a single sheet of printer paper, and ask for an index print with small thumbnails of all the images on your memory card.
The other popular hassle-free printing option is handing your memory card to an output service and letting them crank out the prints. DPOF (Digital Print Order Form) capability provides a paper-free way to indicate your printing preferences, and the 570UZ handles this feature reasonably well, allowing cropping, number of copy selection and printing overlay option settings on an image-by-image basis, though print size and index sheet printing aren't available.
Battery (3.00)
The 570UZ is powered by four AA batteries. Good news: no battery charger to remember while traveling, and a power supply available pretty much anywhere you wander. Bad news: you have to keep buying more batteries, though we found AA rechargeables worked just fine. Olympus figures you'll get 390 shots on a fresh set of alkalines, based on CIPA testing standards. and our testing experience roughly bears this out.
While we figure it's simpler to keep a spare set of rechargeable AAs handy, the camera does have a DC input jack if you want to spring for an optional external power adapter.
*Memory* (2.50)
Olympus stubbornly clings to the xD-Picture Card memory format the company pioneered. The maximum xD capacity is a meager 2 gigabytes and, while that didn't seem meager when the format was introduced, you can easily find fast 16-gigabyte SDHC cards selling today for less than $40, making a 2-gigabyte xD card for $25 seems kind of sad.
Of course, the manual does describe the xD card purchase as 'optional,' since the camera comes with 45 megabytes of built-in RAM, enough for roughly 10 or 12 high-res pictures. Right.
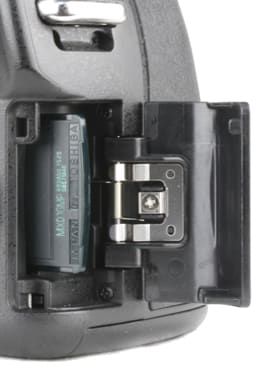
It's time for Olympus to put the xD card format out of its misery.
Other features (4.50)
*Audio recording *– You can set the camera to record a 4-second clip each time you take a photo. This capability can prove useful for grabbing embarrassing wisecracks from your subjects, but there's a practical side as well, allowing you to record information about the photo verbally when taking written notes would be impractical. It's also possible to record a voice annotation for an existing photo, through the playback menu.
Shadow adjustment technology**–**Olympus must be pretty proud of this feature, since they dedicated a prominently placed control button to it. When you turn Shadow adjustment on, it kicks in the face detection feature. If the camera finds a subject with excessive backlighting, it automatically brightens the face to produce a more balanced exposure.
Alarm clock– No, the first question you ask when shopping for a digital camera probably isn't 'Does it have a built-in alarm clock?' but, if you're traveling with your camera in tow, it's not a bad feature to have on hand, particularly given the utter incomprehensibility of so many hotel-room clocks.
Overall Impressions
Value (7.50)
With a list price of $449.99, we think you're getting a lot of camera for the money. Having that big-zoom flexibility in your hands opens up lots of photographic opportunities, and it's just flat-out fun to shoot with.
Comparisons
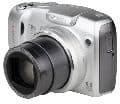
**Canon PowerShot SX110 IS – **A far less expensive camera, at $250, the XS1100 IS zoom is a much more modest 10x versus 20x for the Olympus, but that's still enough to frame many long-lens shots effectively. We like the Canon menu system better than the Olympus style, and as usual, were impressed with the Canon color accuracy, and both cameras offer a full set of manual exposure controls. Physically, though, the clunky Canon body can't compare with the elegantly shaped, solidly built Olympus. Still, if you're looking for higher-than-average zoom capability and can't afford the $450 SP-570UZ, the PowerShot SX1100 IS is worth considering.
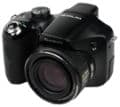
***Casio Exilim EX-FH20* – **This 7-megapixel camera carries a $600 price tag thanks to a special feature above and beyond its 20x zoom: the Casio can shoot up to 40 frames per second, and ultra-slow-motion video at up to 1000 fps. Image quality testing turned up mediocre results, but like the Olympus, not enough to discourage those eager for the special features offered. We prefer the build quality and interface of the Olympus, but sports and other action photographers may be justified paying more to feed their need for speed.

Olympus SP-560UZ**–**In most respects, the 570UZ brings significant advantages over its only slightly lower-priced ($399.99) cousin. The 570UZ offers higher resolution (10 megapixels versus 8) and slightly higher zoom (20x versus 18x), but it's the lab testing that really separate the two, with better color and resolution performance and significantly superior image noise results making the extra $50 for the 570UZ money well spent.

Panasonic Lumix DMC-FZ18** –** The $350 FZ18, with 8-megapixel resolution and an 18x zoom, is a formidable competitor to the Olympus. The two share an SLR-style design that feels good and handles nicely, along with manual exposure control and effective image stabilization systems. The Olympus does have a sharper LCD screen and superior image noise performance and resolution test results, but the Panasonic was the winner when it comes to color accuracy.
**
Who It’s For ***
Point-and-Shooters* – Easy enough for anyone to use in Auto mode with good results, and all that long-zoom freedom is energizing. This is a bulky camera compared to ordinary point-and-shoots, though, and costs a pretty penny.
Budget Consumers – We consider the 570UZ a very good value, but it's certainly not a budget-priced camera..
Gadget Freaks – It's kind of a one-trick pony when it comes to folks who are ga-ga for gadgets, but at 20x zoom, it's quite a trick. True hardcore gadgeteers might veer toward the Casio EX-FH20, combining 20x zoom with incredible burst shooting capability, but that move does mean spending an extra $150.
Manual Control Freaks – Except for the sloppy manual focus, we were impressed with the degree of manual control offered by the SP-570UZ. In addition to the manual exposure options, you get a programmable button as part of the four-way controller group and the option to store four extensive groups of settings for instant access with the My Mode feature.
Pros / Serious Hobbyists – If you're persnickety about image quality, you're going to have some quibbles with your 570UZ results, especially the softness of shots taken at extreme telephoto range. On the other hand, this camera is so much more portable than an SLR decked out with a big zoom lens, and exceeds the available SLR zoom range by such a healthy margin, we could easily see adding the Olympus to your traveling gear collection.
Conclusion
**
Conclusion**

Yes, there's room for improvement in the lab testing, and even after using it for a few weeks the sloppy zoom control is still annoying, but overall this is a camera we really enjoy. It feels great in your hand, delivers photos that stand up well at all but enormous print sizes, and provides enough manual control to satisfy our urges to tweak and fiddle. The controls are well organized for quick adjustments, and the LCD stands up to outdoor illumination better than most (with the electronic viewfinder as a perfectly serviceable backup). The full-resolution burst-mode is pokey, but snagging 5-megapixel images at a solid seven frames a second nearly makes up for that shortcoming, and the rock-solid image stabilization system is a true pleasure, making handheld long-zoom photography literally a snap. We usually grab an SLR when headed out to shoot, but recently we've found ourselves voting for portability and long zoom versus optimal image quality on several occasions, and that's high praise for the 570UZ.
Sample Photos
**Sample Photos
Click on any of the images below to view the full-sized original image. However, please note that some of the images are extremely large (up to several megabytes) and could take a long time to download. **
**
You can view photos taken with the Olympus SP-570UZ by clicking the web site links below.**
[

](http://search.fotki.com/?q=570UZ)[

](http://www.smugmug.com/search/index.mg?searchWords=570UZ&searchType=global&x=0&y=0)[

](http://www.flickr.com/search/?q=570UZ&m=text)
Specs / Ratings
**Specs Table
**{{manufacturer_specs_table}}{{raw_scores_table}}
Meet the tester

Steve Morgenstern
Editor
Steve Morgenstern is a valued contributor to the Reviewed.com family of sites.
Checking our work.
Our team is here to help you buy the best stuff and love what you own. Our writers, editors, and experts obsess over the products we cover to make sure you're confident and satisfied. Have a different opinion about something we recommend? Email us and we'll compare notes.
Shoot us an email