Introduction
Section 1 Text - Page 1
Judging by the clip of “Baby’s Lunch”, it seems like what we film hasn’t changed that much over 100 years. How we film or record or capture has changed a good deal, however. Home movies are now home videos, and film has all but been forgotten by consumers.
This article isn’t just a history lesson, but it’s also an attempt to give you a bit of advice on how to keep your old home movies around forever, specifically how to transfer them into the digital age. Hopefully, the 1995 video of your 2-year-old eating lunch will be as easy for your descendants to find in 100 years as the Lumiere Brothers clip was for us... more
Section 2 Text - Page 1
Section 3 Text - Page 1
Section 4 Text - Page 1
Section 5 Text - Page 1
Section 1 Title - Page 2
Converting Film to Video at Home
Section 1 Text - Page 2
If you have home movies that date back earlier than 1975, chances are they're on some kind of film instead of video. Just like the various memory card options we have today, film came in a variety of formats for home use: 16mm, 8mm, Super 8, or Single-8m.
Film is a fairly durable format if stored properly, but the problem with film is that it requires a lot of work and equipment to playback your movies. You need a projector that's in working condition, which can be rather hard to come across these days. Finding someone who knows how to properly thread and setup this project may be even more challenging.
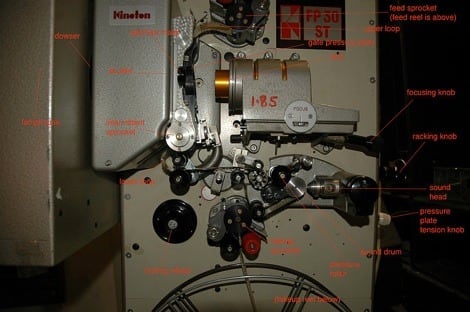
If you can get a projector working, however, there's a very simple way to copy your films to video—just point a camcorder at the screen and hit the record button. For the best quality, you may want to try projecting a fairly small image of your film on the screen. You'll also want a camcorder with a good set of manual controls, as you may need to adjust shutter speed and exposure settings in order to eliminate any flicker caused by the film projection. With a little trial-and-error you can actually get decent-quality copies of your home movie films this way. And, if you already have the equipment, its cheap and easy.
Section 2 Title - Page 2
Using a Professional Film-Video Transfer Company
Section 2 Text - Page 2
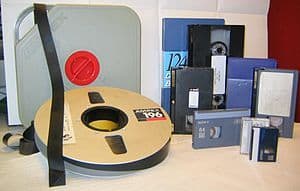
Your other option is to simply send your films to a film transfer company. If you have one or two small reels of film that you want copied to DVDs without hassle, this is probably your best option. But, if you have a lot of old home movies on film, prices from transfer companies can be outrageously high. We looked at three film to video transfer companies online and found the prices ranged from around 10 cents to 30 cents per foot of film transferred (depending on the quality of the transfer). So, on average, around 600 feet of 8mm film (half and hour of footage) will cost roughly $100 to copy to DVD. The cool thing is, many of these places can also put your converted footage as individual files on a hard drive or USB thumb drive—that way you can work with them on your computer with ease. This comes at an additional cost, of course.
Here's the three sites we looked at: The Transfer Station, Home Movie Depot, Video Conversion Experts
There are many others just like these three, and there may even be a local store in your town that will do a film to video conversion. If you have lots of old film reels, see if they have a bulk discount. Some of the places we looked at had "by the box deals" where they'd convert a whole box of old films for a set price.
Section 3 Text - Page 2
Section 4 Text - Page 2
Section 5 Text - Page 2
Section 1 Title - Page 3
Converting Analog Tape to Digital
Section 1 Text - Page 3
Video tape has been around since the 1960s, but it really came into its own in the 80s and 90s as a home video format. Just like film, many varieties of tape have found themselves in the consumer market - Beta, VHS, VHS-C, 8mm, Hi-8, and a few others. With the advent of digital video, most camcorders switched over to MiniDV tape recording, but there was also a short-lived format called Digital8.
With tape, you could also choose to send your old videos to a transfer house to get digital copies. Prices won't be nearly as high as film, and you can expect to pay around $10 - $30 per tape converting to DVD. You can also do conversions yourself pretty easily, and it's entirely possible that you already have all of the necessary equipment. Also, it can occasionally be fun!
Section 2 Title - Page 3
Digitizing Analog Video
Section 2 Text - Page 3
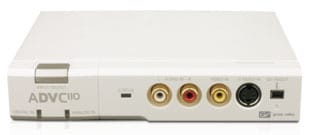
To get your analog tape formats onto a digital medium like DVD, the footage must first be "digitized." This is the hardest step, and it requires some special equipment. Your options include using analog to digital conversion boxes, using camcorders with built-in AV to DV converters, or using DVD recorders that can digitize your analog video and burn it to disc in one step.
Your best options depend on what kind of tapes you have your old home movies stored on. If most are on VHS or VHS-C, you can probably get away with purchasing an all-in-one DVD recorder with a VHS deck that makes direct copies of your tapes to DVD (like this one). Or, if you already own a VCR that can play your tapes, you can simply buy a stand-alone DVD recorder and hook it up to your VHS deck. It's the same concept as the DVD/VHS combo deck, but you'd be using a separate product for each (one VHS player and one DVD recorder, get it?). The DVD recorder will "digitize" the footage from the VHS tapes as it copies the videos to DVD. These products can be complicated to use, so be prepared to read over the manual a few times before you get it working smoothly.
The advantage of doing things this way is that you avoid the use of a computer entirely. You don't need to worry about importing your digitized footage using editing software and then setting it up to burn to DVD. Of course, this also limits your ability to edit or work with your footage. You're simply making a back-up of the analog video and spitting it out onto DVD.
Section 3 Title - Page 3
Converting Hi-8 or 8mm Tapes to Digital
Section 3 Text - Page 3
In the mid-late 90s the most popular tape format for camcorders was called Video8 or 8mm, which also included Hi-8. These formats recorded to small tapes using an analog format—not digital. So, if you have home movies on these tapes, the footage must be digitized before you can work with it on a computer or burn it to a DVD.

Your best bet for doing digitizing at home is to buy an analog to digital converter (AV-DV converter). An AV-DV converter allows you to input video from an analog recording device, and then output a digitized version to your computer. The converters usually have a set of analog AV inputs (the red, white, and yellow RCA cables) on the front, and a FireWire (also called IEEE1394 or iLink) output on the back that runs into your computer.
The converter boxes aren't cheap, as they can range from $200 - $400, and they don't solve your problem if you're actually missing a working camcorder that allows you to playback your tapes. See, you still need to be able to play the videos in order for the converter box to digitize them. If you don't have a device that can even play your tapes then you should probably start looking for an old 8mm camcorder on eBay.
Ah, but there is one other trick you could try before giving up and sending your tapes off to a digital transfer warehouse. For a short period of time, Sony and a few other manufacturers made digital camcorders that recorded to 8mm tape. This format was called Digital8, and a number of those camcorders allowed you to playback regular (analog) Hi-8 and 8mm tapes in addition to Digital8 tapes. The advantage of this is the camcorder works as both a tape deck for playing the tapes, and as a digital converter. You simply pop the analog tapes in the camcorder, turn on the conversion feature, and you're ready to output the videos to a computer via FireWire. Of course, just like Hi-8 and 8mm, Digital8 camcorders are no longer supported or manufactured. You'll have to shop around for a used or refurbished model like this in order to buy one.
Also, be aware that this method of digitizing your home movies requires the use of a computer, specifically one with a FireWire port. You also need to use software to "capture" your video and import it onto your computer. Most Macintosh computers come with FireWire ports, and you should have no problem capturing video this way using iMovie or any professional video editing software. FireWire ports are less common on PCs, but you can still find them, or you can buy FireWire adapters like this or this.
Section 4 Title - Page 3
MiniDV Camcorders with AV to DV Conversion
Section 4 Text - Page 3
MiniDV camcorders represent the final bastion of tape-based video cameras, and there are actually a few models that are still available new from manufacturers. The Canon HV40 is the last MiniDV camcorder we reviewed, and it, like many other MiniDV models, can function as an AV to DV converter in a roundabout way. The camcorder has the same set of ports that you're likely to find on an AV-DV conversion box (an AV input and a FireWire port). This means you can input a signal from an analog device (be it a VHS tape deck, an 8mm camcorder, or even a Beta VCR), and have the Canon HV40 act as a digital converter by connecting it to your computer via FireWire.
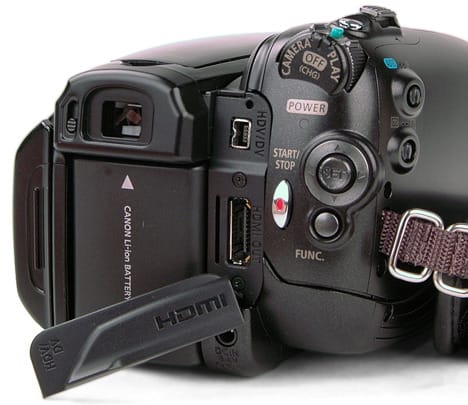
It's a roundabout setup that requires a lot of wires and cables, but it could end up saving you some money. Many MiniDV camcorders include this AV to DV conversion feature, and it is likely that you could find a used model that has this option for a few hundred bucks. The Canon HV40 is the only new camcorder we know of that has this feature, but there are many older and cheaper models that also include this feature. You just have to search for them. Look for MiniDV camcorders that have AV inputs listed in their specs, or look for something that specifically states AV to DV conversion in the manual.
Also, check out this page from our Canon HV40 review for photos and more information about using it to digitize analog video.
Section 5 Text - Page 3
Section 1 Text - Page 4
Section 2 Text - Page 4
Section 3 Text - Page 4
Section 4 Text - Page 4
Section 5 Text - Page 4
Section 1 Text - Page 5
Section 2 Text - Page 5
Section 3 Text - Page 5
Section 4 Text - Page 5
Section 5 Text - Page 5
Meet the tester

Jeremy is the video expert of our imaging team and Reviewed.com's head of video production. Originally from Pennsylvania and upstate NY, he graduated from Bard college with a degree in film and electronic media. He has been living and working in New England since 2005.
Checking our work.
Our team is here to help you buy the best stuff and love what you own. Our writers, editors, and experts obsess over the products we cover to make sure you're confident and satisfied. Have a different opinion about something we recommend? Email us and we'll compare notes.
Shoot us an email